")
")
- Сообщений: 31
- Спасибо получено: 0
- Вы здесь:
- Главная
- Форум
- International forum
- International forum
- Battle report: The Retaliation Under Kashira
Battle report: The Retaliation Under Kashira
- JonDee
Автор темы
- Не в сети
- Осваиваюсь на форуме

Меньше Больше
2 года 3 мес. назад#47546от JonDee
JonDee создал эту тему: Battle report: The Retaliation Under Kashira
This weekend my friend Nick visited from Toronto, and we played a game of Battle for Moscow using the “Retaliation under Kashira” scenario that I downloaded from the Zvezda website.
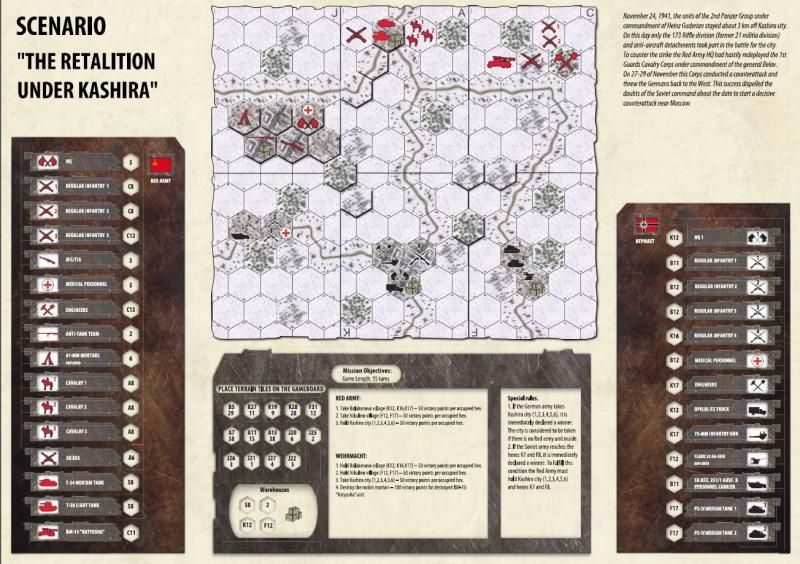
The Scenario
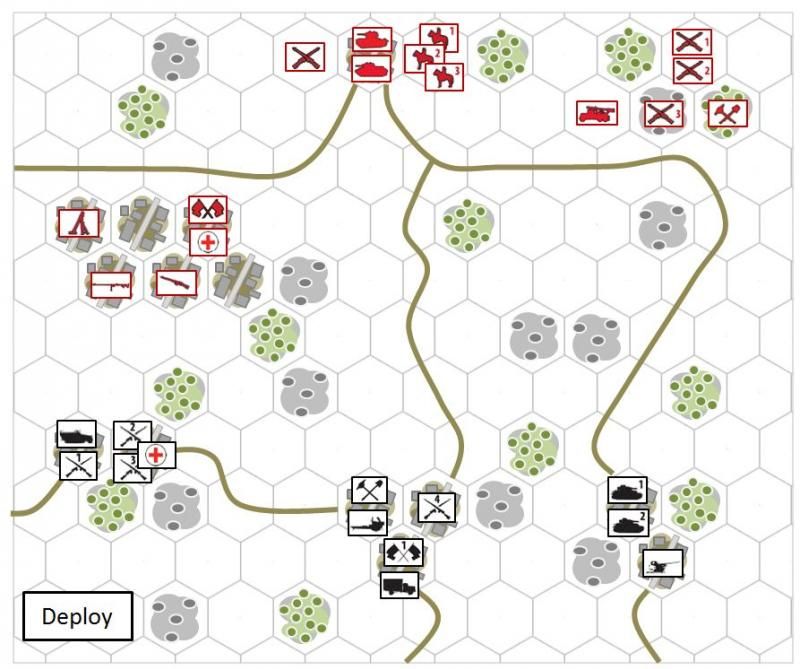
The scenario looked interesting because it was a chance to deploy some seldom-seen units (Cavalry! A Katyusha!) in what looked like a dynamic scenario lasting 15 turns. The Soviets start with a larger force, entering from the top of the board with some forward elements already holding a key city.
There are two ways to score victory points:
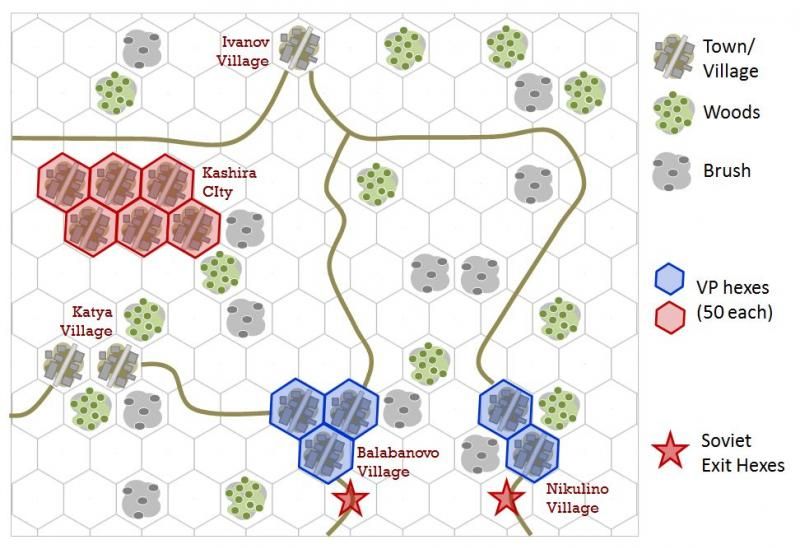
1. The hexes highlighted in red and blue on the map below are worth 50 victory points to the side that holds them at the end of the game. (A unit must occupy a hex in order to claim the victory points at the end of the game.) This includes the German-held villages of Balabanovo and Nikulino, and the Soviet-held city of Kashira itself.
2. The Germans score an extra 100 points if they destroy the Katyusha rocket launcher.
Both sides also have an “instant win” condition:
- Germans: the Germans win immediately if they have at least one unit in the city of Kashira while the Soviets have none.
- Soviets: The Soviets win immediately if they hold Kashira, and at the same time have a unit on each of the marked road hexes at the bottom of the board.
The Germans start holding some villages and look set for a defensive posture. But they can’t afford to sit still, for two reasons:
- if left alone, the Katyusha will wreak havoc on the German forces; and besides, the Germans need those 100 victory points for destroying it.
- the Soviets can win by sheer victory points (if the Katyusha isn’t destroyed) simply by reinforcing and holding every hex in Kashira.
Discussion
We looked at the scenario and talked through some possibilities.
We agreed that the Germans seemed to have an uphill battle. The Soviets have a larger force that is better equipped for an attack (with formidable artillery support); yet it was the German player who was compelled to seize the initiative and kill the Katyusha, contest Soviet-held Kashira, or both in order to have a chance at victory.
At the same time, the German player had to keep the Soviets from achieving their instant-win condition by pushing fast units to the two road hexes at the bottom of the board.
It looked like the Germans player had to destroy that Katyusha, and quickly; otherwise the Soviets could use it pound any defending Germans from afar with rockets and especially in combination with the mortar, leaving the German units easy pickings for additional combined fire or assault.
The two German medium tanks had an advantage over the Soviet Medium and Light; but that was no guarantee the Germans would win a tank duel.
Choosing sides
Because Nick was visiting he got the choice of sides; and he chose the Germans since it was a smaller force and he hadn’t played in a while.
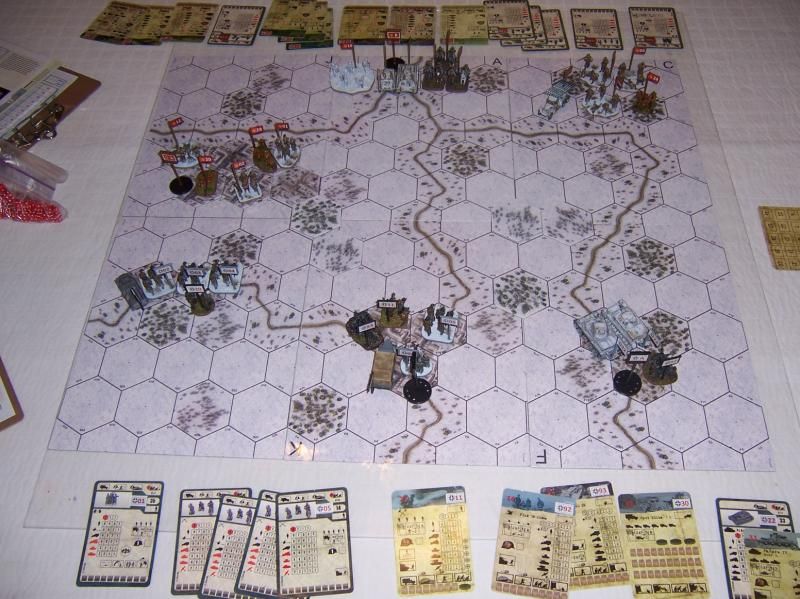
Deployment
As you can see from the illustration (and a picture of our setup), the Soviets start with a strong force, particularly with the tanks, ski troops and cavalry forming a solid and mobile attack element just entering the board. The Germans have a temporary strength advantage near the city of Kashira, but the Soviets can quickly outnumber them if they direct forces that way.
Turn 1
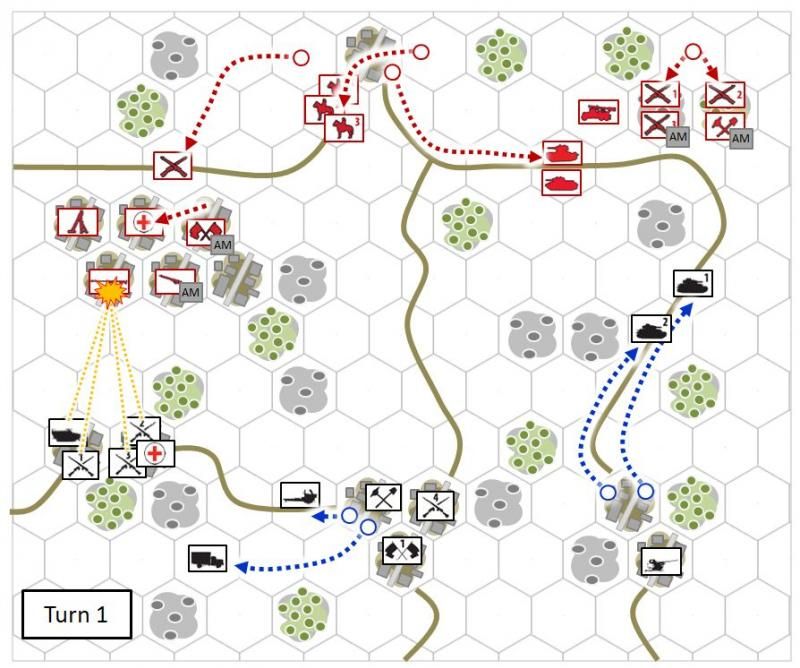
The Katyusha rocket launcher used Suppressive Fire on the German engineers and infantry gun in Balabanovo, but even though it rolled lots of dice it hit only on 1s, and failed to overcome their defense to inflict any casualties. With the German HQ nearby, nobody failed the Fortitude test for having come under Suppressive Fire.
Nick used every available unit to pour Suppressive Fire onto the lone Soviet anti-tank rile team in Kashira. Though at this range everything was rolling for 1s, the combined fire was enough to destroy it outright.
This cleared the way for the halftrack to move forward next turn unopposed.
The German truck and infantry gun (having survived Suppressive Fire from the Katyusha) left the relative safety of Balabanovo and began moving over to help the Germans near Kashira.
The two Panzer IVs moved aggressively up the road on the right side of the board, planning to kill the Katyusha. I expected this and had moved my two tanks in that direction to protect the Katyuha and support the push I expected to make down that side of the board.
My other attack units – the Skiers and the three Cavalry – all moved over toward Kashira to help occupy and defend it, and possibly push forward later.
Turn 2
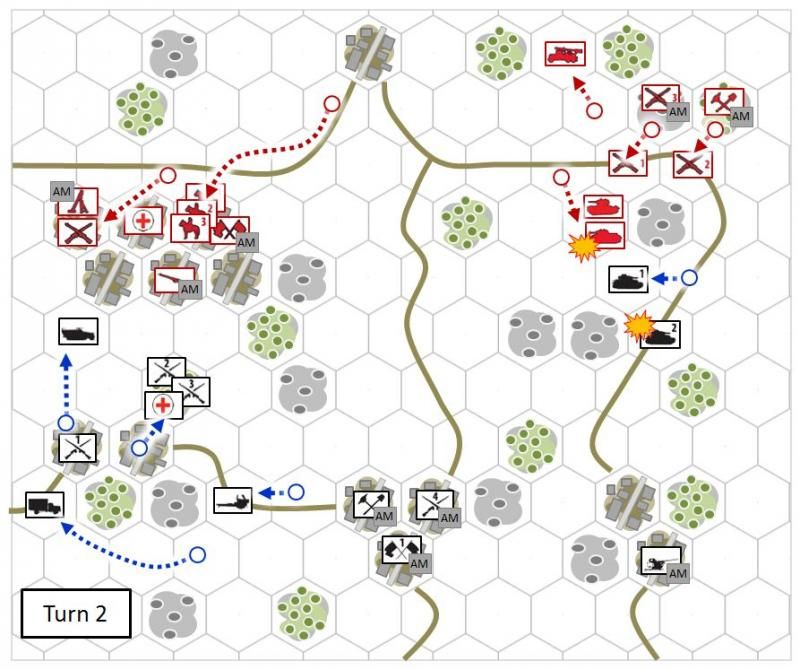
The German and Soviet tanks faced each other across a clearing, and Nick and I both had to puzzle out what orders the other player might issue to these key units. If we just fired from where we were, our Accuracy was a paltry 1; if we could get just one hex closer, this jumped to a respectable 2.
Nearby, the Katyusha had pulled back to put some distance between itself and the German tanks, and two units of infantry moved into the road to hamper and maybe threaten the German tanks. (Here I made a mistake; I hadn’t noticed that the Katyusha had to execute a Withdraw order before it could move. In the end I don’t think this would have made a difference.)
In the end, Nick's two tanks used a combination of Suppressive Fire / Move and Fire in an attempt to take down the T-34; he managed to inflict two casualties, but that left the T-34 with one “wound” remaining. For my part, two Move and Fire orders brought me into better range and together my two tanks destroyed one of the Panzer IVs.
This was a coup for the Soviets and gave me a strong advantage.
Elsewhere Nick moved his Halftrack, no longer threatened by the Soviet ATR, up to Kashira and began firing at the defenders from the relative safety of the open ground. But he couldn’t overcome the combination of the defenders’ terrain bonus, their Defend orders, and the ministrations of the Soviet Medics.
(There were several exchanges of fire involving the halftrack and the Soviet mortar that I don't report in subsequent turns, as they all ended up having no effect due to the high defense of their targets in good cover.)
The Soviet Cavalry entered Kashira to reinforce the defenders.
Turn 3
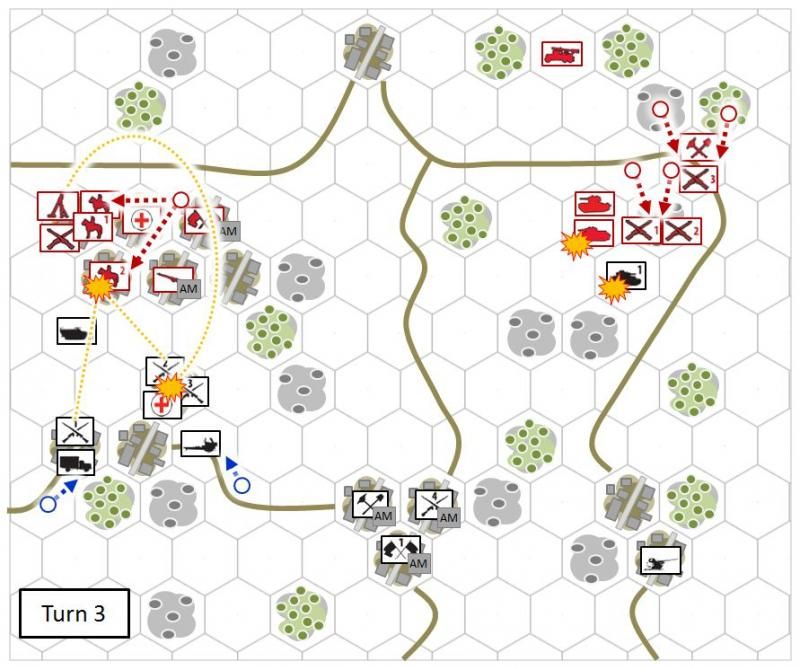
Unsurprisingly, all of the tanks used Suppressive Fire. Nick rolled poorly and failed to inflict the final wound on the T-34. But in return my tanks inflicted only two casualties, leaving the Panzer IV with one “wound” remaining.
Nearby the Katyusha had used a Defend order this turn in case it had been the target of the Panzer’s fire. Two of my infantry units moved forward into the brush next to the Panzer IV, ready to assault the tank if it survived the next turn’s shooting.
In Kashira, I risked a Suppressive Fire shot with the Mortar on Nick’s advancing infantry and medic in the woods (which gave infantry Defense +2 instead of the town's Defense +3). The infantry were merely grazed thanks to a comnbination of the terrrain bonus and Defend orders; but the Medics were busy with the First Aid order instead of Defending, and I was lucky and rolled well enough to kill the German Medics outright.
Turn 4

The Katyusha again Defended, and I ordered my infantry to Assault the Panzer IV in case it again survived the Soviet tanks’ Suppressive Fire.
However the Panzer IV was not that lucky, and was immediately knocked out by my tanks. Worse, its own Suppressive Fire again failed to wound and kill the T-34 (partly because of the Panzer’s reduced Firepower due to its casualties in the previous turn).
In truth this was the decisive moment in the game.
In Kashira, the Soviet Cavalry swept forward to keep the Halftrack from possibly assaulting into the city. But my concerns were misplaced as the Halftrack was content to fire from the relative safety of the open ground. Worse, moving one of my cavalry units into the leading hexes of Kashira exposed it to German Defensive Fire, and the Cavalry suffered a needless casualty. (Next turn, Suppressive Fire by those same German units would finish off that Cavalry unit before it could move again.)
Turns 5 through 7
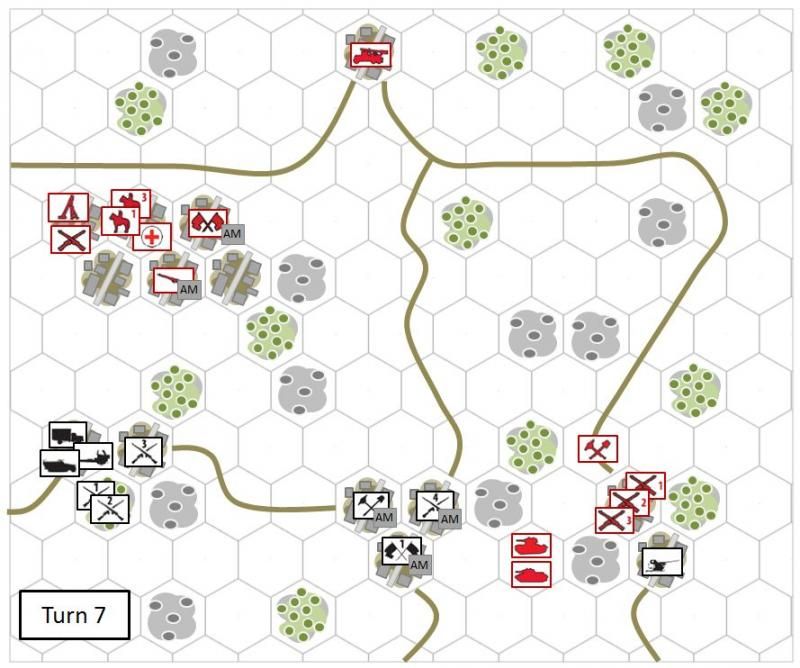
With Kashira now well reinforced and his halftrack running low on ammunition, Nick pulled back from Kashira to the little village of Katya. There his truck would resupply several units, which took two turns to complete.
At the same time my tanks and infantry, now unopposed, all surged down the road toward the village of Nikulino.
On turn 7 my infantry advanced into that village, triggering Ambush fire from the lone AA gun which failed to inflict casualties.
Turn 8
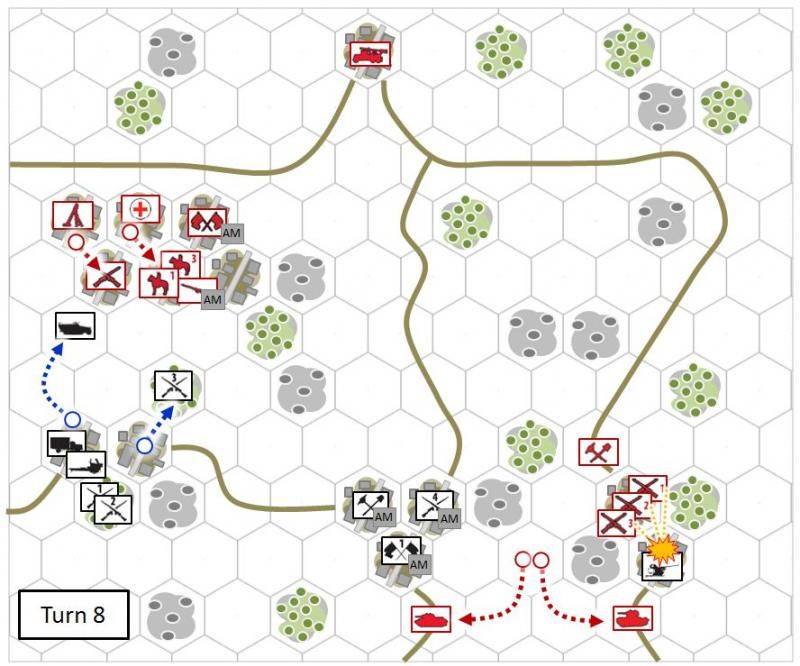
Near Kashira, Nick moved his resupplied halftrack forward again. Over in Nikulino, my infantry used Suppressive Fire to destroy the AA gun (whose own Suppressive Fire failed to wound the infantry in return).
Then the two Soviet tanks moved forward and occupied the two exit hexes beyond Balabanovo and Nikulino.
Since I still held Kashira, this immediately ended the game with a Soviet victory.
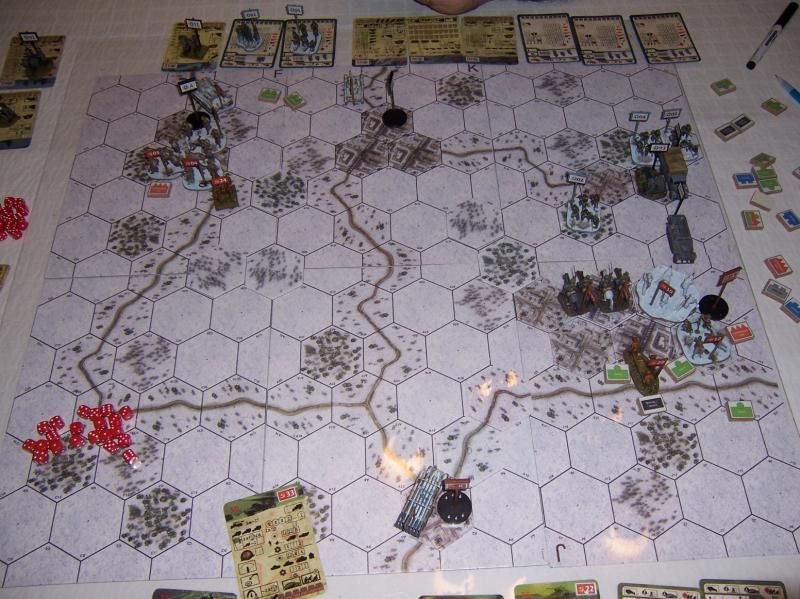
Turn 8 board (from the Soviet side)
AFTERMATH
Looking over the scenario, we felt we’d been right: there’s too heavy a burden on the German player given the disparity in forces.
Granted, the dice could have gone the other way in the tank battle; if the Panzers had won that exchange, they could have destroyed the Katyusha and wreaked havoc on the Soviets in Kashira. And since the Germans have two Medium tanks to the Soviets’ one Medium and one Light, that’s a reasonable outcome. But that just means there’s too much riding for both sides on the outcome of the tank battle.
To correct this, I suggest the following:
- remove the Katyusha from the scenario. This means a defensive posture for the Germans is feasible without having to worry about this powerful artillery piece pounding them from afar.
- lower the strength of the armour for both sides to make it a less decisive factor. Replace the two Panzer IVs with a Panzer II and an Armoured Car, and replace the T-34 with a BT-5 or a second T-26. This means the German infantry gun and AA gun can credibly threaten the Soviet armour. Even assaulting infantry have a chance against these less-armoured tanks, so any armour advantage for either side won’t be quite so decisive.
- make the hexes of Kashira worth 25 to the Soviets, but 50 each to the Germans. Now the Soviets must attack with their larger force, as holding all of Kashira earns only 150 points to the German 250.
- also, because they no longer have to dash forward to destroy the Katyusha, the German armour can be held in reserve until the Soviet attack begins to unfold. At that point the German player can use them however and whenever looks best to foil the Soviet plans.
- finally, allow the German player the option to move the AA gun forward one hex to the leading hex of the Nikulino village, instead of languishing the back where it can’t see anything beyond adjacent hexes.
We'd be happy to hear from others who try this scenario, whether modified or using the original setup!

The Scenario
The scenario looked interesting because it was a chance to deploy some seldom-seen units (Cavalry! A Katyusha!) in what looked like a dynamic scenario lasting 15 turns. The Soviets start with a larger force, entering from the top of the board with some forward elements already holding a key city.

There are two ways to score victory points:
1. The hexes highlighted in red and blue on the map below are worth 50 victory points to the side that holds them at the end of the game. (A unit must occupy a hex in order to claim the victory points at the end of the game.) This includes the German-held villages of Balabanovo and Nikulino, and the Soviet-held city of Kashira itself.
2. The Germans score an extra 100 points if they destroy the Katyusha rocket launcher.
Both sides also have an “instant win” condition:
- Germans: the Germans win immediately if they have at least one unit in the city of Kashira while the Soviets have none.
- Soviets: The Soviets win immediately if they hold Kashira, and at the same time have a unit on each of the marked road hexes at the bottom of the board.
The Germans start holding some villages and look set for a defensive posture. But they can’t afford to sit still, for two reasons:
- if left alone, the Katyusha will wreak havoc on the German forces; and besides, the Germans need those 100 victory points for destroying it.
- the Soviets can win by sheer victory points (if the Katyusha isn’t destroyed) simply by reinforcing and holding every hex in Kashira.
Discussion
We looked at the scenario and talked through some possibilities.
We agreed that the Germans seemed to have an uphill battle. The Soviets have a larger force that is better equipped for an attack (with formidable artillery support); yet it was the German player who was compelled to seize the initiative and kill the Katyusha, contest Soviet-held Kashira, or both in order to have a chance at victory.
At the same time, the German player had to keep the Soviets from achieving their instant-win condition by pushing fast units to the two road hexes at the bottom of the board.
It looked like the Germans player had to destroy that Katyusha, and quickly; otherwise the Soviets could use it pound any defending Germans from afar with rockets and especially in combination with the mortar, leaving the German units easy pickings for additional combined fire or assault.
The two German medium tanks had an advantage over the Soviet Medium and Light; but that was no guarantee the Germans would win a tank duel.
Choosing sides
Because Nick was visiting he got the choice of sides; and he chose the Germans since it was a smaller force and he hadn’t played in a while.
Deployment
As you can see from the illustration (and a picture of our setup), the Soviets start with a strong force, particularly with the tanks, ski troops and cavalry forming a solid and mobile attack element just entering the board. The Germans have a temporary strength advantage near the city of Kashira, but the Soviets can quickly outnumber them if they direct forces that way.


Turn 1

The Katyusha rocket launcher used Suppressive Fire on the German engineers and infantry gun in Balabanovo, but even though it rolled lots of dice it hit only on 1s, and failed to overcome their defense to inflict any casualties. With the German HQ nearby, nobody failed the Fortitude test for having come under Suppressive Fire.
Nick used every available unit to pour Suppressive Fire onto the lone Soviet anti-tank rile team in Kashira. Though at this range everything was rolling for 1s, the combined fire was enough to destroy it outright.
This cleared the way for the halftrack to move forward next turn unopposed.
The German truck and infantry gun (having survived Suppressive Fire from the Katyusha) left the relative safety of Balabanovo and began moving over to help the Germans near Kashira.
The two Panzer IVs moved aggressively up the road on the right side of the board, planning to kill the Katyusha. I expected this and had moved my two tanks in that direction to protect the Katyuha and support the push I expected to make down that side of the board.
My other attack units – the Skiers and the three Cavalry – all moved over toward Kashira to help occupy and defend it, and possibly push forward later.
Turn 2

The German and Soviet tanks faced each other across a clearing, and Nick and I both had to puzzle out what orders the other player might issue to these key units. If we just fired from where we were, our Accuracy was a paltry 1; if we could get just one hex closer, this jumped to a respectable 2.
Nearby, the Katyusha had pulled back to put some distance between itself and the German tanks, and two units of infantry moved into the road to hamper and maybe threaten the German tanks. (Here I made a mistake; I hadn’t noticed that the Katyusha had to execute a Withdraw order before it could move. In the end I don’t think this would have made a difference.)
In the end, Nick's two tanks used a combination of Suppressive Fire / Move and Fire in an attempt to take down the T-34; he managed to inflict two casualties, but that left the T-34 with one “wound” remaining. For my part, two Move and Fire orders brought me into better range and together my two tanks destroyed one of the Panzer IVs.
This was a coup for the Soviets and gave me a strong advantage.
Elsewhere Nick moved his Halftrack, no longer threatened by the Soviet ATR, up to Kashira and began firing at the defenders from the relative safety of the open ground. But he couldn’t overcome the combination of the defenders’ terrain bonus, their Defend orders, and the ministrations of the Soviet Medics.
(There were several exchanges of fire involving the halftrack and the Soviet mortar that I don't report in subsequent turns, as they all ended up having no effect due to the high defense of their targets in good cover.)
The Soviet Cavalry entered Kashira to reinforce the defenders.
Turn 3

Unsurprisingly, all of the tanks used Suppressive Fire. Nick rolled poorly and failed to inflict the final wound on the T-34. But in return my tanks inflicted only two casualties, leaving the Panzer IV with one “wound” remaining.
Nearby the Katyusha had used a Defend order this turn in case it had been the target of the Panzer’s fire. Two of my infantry units moved forward into the brush next to the Panzer IV, ready to assault the tank if it survived the next turn’s shooting.
In Kashira, I risked a Suppressive Fire shot with the Mortar on Nick’s advancing infantry and medic in the woods (which gave infantry Defense +2 instead of the town's Defense +3). The infantry were merely grazed thanks to a comnbination of the terrrain bonus and Defend orders; but the Medics were busy with the First Aid order instead of Defending, and I was lucky and rolled well enough to kill the German Medics outright.
Turn 4

The Katyusha again Defended, and I ordered my infantry to Assault the Panzer IV in case it again survived the Soviet tanks’ Suppressive Fire.
However the Panzer IV was not that lucky, and was immediately knocked out by my tanks. Worse, its own Suppressive Fire again failed to wound and kill the T-34 (partly because of the Panzer’s reduced Firepower due to its casualties in the previous turn).
In truth this was the decisive moment in the game.
In Kashira, the Soviet Cavalry swept forward to keep the Halftrack from possibly assaulting into the city. But my concerns were misplaced as the Halftrack was content to fire from the relative safety of the open ground. Worse, moving one of my cavalry units into the leading hexes of Kashira exposed it to German Defensive Fire, and the Cavalry suffered a needless casualty. (Next turn, Suppressive Fire by those same German units would finish off that Cavalry unit before it could move again.)
Turns 5 through 7

With Kashira now well reinforced and his halftrack running low on ammunition, Nick pulled back from Kashira to the little village of Katya. There his truck would resupply several units, which took two turns to complete.
At the same time my tanks and infantry, now unopposed, all surged down the road toward the village of Nikulino.
On turn 7 my infantry advanced into that village, triggering Ambush fire from the lone AA gun which failed to inflict casualties.
Turn 8

Near Kashira, Nick moved his resupplied halftrack forward again. Over in Nikulino, my infantry used Suppressive Fire to destroy the AA gun (whose own Suppressive Fire failed to wound the infantry in return).
Then the two Soviet tanks moved forward and occupied the two exit hexes beyond Balabanovo and Nikulino.
Since I still held Kashira, this immediately ended the game with a Soviet victory.
Turn 8 board (from the Soviet side)

AFTERMATH
Looking over the scenario, we felt we’d been right: there’s too heavy a burden on the German player given the disparity in forces.
Granted, the dice could have gone the other way in the tank battle; if the Panzers had won that exchange, they could have destroyed the Katyusha and wreaked havoc on the Soviets in Kashira. And since the Germans have two Medium tanks to the Soviets’ one Medium and one Light, that’s a reasonable outcome. But that just means there’s too much riding for both sides on the outcome of the tank battle.
To correct this, I suggest the following:
- remove the Katyusha from the scenario. This means a defensive posture for the Germans is feasible without having to worry about this powerful artillery piece pounding them from afar.
- lower the strength of the armour for both sides to make it a less decisive factor. Replace the two Panzer IVs with a Panzer II and an Armoured Car, and replace the T-34 with a BT-5 or a second T-26. This means the German infantry gun and AA gun can credibly threaten the Soviet armour. Even assaulting infantry have a chance against these less-armoured tanks, so any armour advantage for either side won’t be quite so decisive.
- make the hexes of Kashira worth 25 to the Soviets, but 50 each to the Germans. Now the Soviets must attack with their larger force, as holding all of Kashira earns only 150 points to the German 250.
- also, because they no longer have to dash forward to destroy the Katyusha, the German armour can be held in reserve until the Soviet attack begins to unfold. At that point the German player can use them however and whenever looks best to foil the Soviet plans.
- finally, allow the German player the option to move the AA gun forward one hex to the leading hex of the Nikulino village, instead of languishing the back where it can’t see anything beyond adjacent hexes.
We'd be happy to hear from others who try this scenario, whether modified or using the original setup!
Пожалуйста Войти , чтобы присоединиться к беседе.
- Gerry
- Не в сети
- Живу я здесь


Меньше Больше
- Сообщений: 377
- Спасибо получено: 0
- JonDee
- Не в сети
- Осваиваюсь на форуме
Меньше Больше
- Сообщений: 31
- Спасибо получено: 0
2 года 3 мес. назад#47550от JonDee
JonDee ответил в теме Re: Battle report: The Retaliation Under Kashira
Thanks!
I think the drawn map and the icons make the identity and positions of units much clearer than photographs. Naturally it's more work, but it was rewarding to see it through.
I captured the icons for the units from the scenario PDF itself, and cleaned them up a bit with graphics software. Then it was easy to add them to the map I had made and move them around.
It's still hard to show the sequence of phases in a single turn (did that tank die to suppressive fire, or assault?). In the future I might use several images to separately illustate the different phases for key events.
Пожалуйста Войти , чтобы присоединиться к беседе.
- Kirill180
- Не в сети
- Завсегдатай


Меньше Больше
- Сообщений: 164
- Спасибо получено: 0
2 года 3 мес. назад#47551от Kirill180
Kirill180 ответил в теме Re: Battle report: The Retaliation Under Kashira
A magnificent report, I enjoyed every part of it!
But I agree that scenario is not balanced. And your suggestions in the end are well-taken. Katyusha should be removed undoubtedly (or balanced by a German howitzer), less armoured tanks would be more suitable, making hexes of Kashira more valuable for Germans sounds reasonable.
But I agree that scenario is not balanced. And your suggestions in the end are well-taken. Katyusha should be removed undoubtedly (or balanced by a German howitzer), less armoured tanks would be more suitable, making hexes of Kashira more valuable for Germans sounds reasonable.
It's worth efforts - everything looks excellent.JonDee пишет: I think the drawn map and the icons make the identity and positions of units much clearer than photographs. Naturally it's more work, but it was rewarding to see it through.
Пожалуйста Войти , чтобы присоединиться к беседе.
- JonDee
- Не в сети
- Осваиваюсь на форуме
Меньше Больше
- Сообщений: 31
- Спасибо получено: 0