")
")
- Сообщений: 31
- Спасибо получено: 0
- Вы здесь:
- Главная
- Форум
- International forum
- International forum
- Battle for Moscow Scenario 2: Our second try
Battle for Moscow Scenario 2: Our second try
- JonDee
-
Автор темы
- Не в сети
- Осваиваюсь на форуме
-

Меньше
Больше
2 года 6 мес. назад #47276
от JonDee
JonDee создал эту тему: Battle for Moscow Scenario 2: Our second try
After our first game with the scenario ended in a quick German victory, and I learned how NOT to play the Soviet side, we decided to try again employing the lessons we’d learned from the Soviet defeat.

I provided a detailed scenario background in my first report for this scenario. The game length is 12 turns, and the objective is to have the highest Victory Point total by the end of the game. Victory Points are obtained by:
• killing enemy units (score the unit’s point cost)
• killing or capturing the enemy HQ
• and (for the Germans) 50 points for each hex of the town containing only German units at the end of the 12th turn.
Our experience in the first game had shown how critical early kills were to seize even a tiny VP advantage; things were bound to get bloody right away!
The launching off point for the scenario

TURN 1
My experience in our first game had taught me that I had to get out there and do some damage with the T-35 while I had the local advantage. The Panzer III did pose a modest threat to my tank, but the risk couldn’t be avoided.
Tom was likewise determined to score some points quickly; it was a race to see who could score the first points and set the terms for the battle.
For the first turn, since so much was going on I have used separate illustrations to show movement and then fire (although Suppressive Fire happened before the moves did.)


Tom’s HQ entered Ambush and was removed from the board to better safety. My defenders in the town shifted position while the two Militia units began to dig trenches in their respective hexes. This time I was determined that there would be an assault, and that I’d be ready for it!
Tom’s mortar surprisingly failed to wound the Ski troops (15 dice for 1s managed only a single hit), who were able to move out of its range. And once the Ski troops reached the protection of the Forest, even the additional fire later in the turn from the Panzer III failed to harm them.
The Soviets had almost the same experience. The T-35 dashed forward and fired from close range at Tom’s infantry; but this produced no effect even with support from my Mortar. The protection of the Forest was considerable!
SCORE: Germans 0, Soviets 0
TURN 2
Both sides were still out for blood, and we both had powerful units in sight and range of their targets. There would be no hesitation!

Tom’s Panzer III used Suppressive Fire, hoping to overcome the Ski troops’ protection in the Forest; but he only managed two hits which their enhanced Defense value absorbed. But to my dismay, the Skiers failed their Fortitude test, and that meant they lost their Move order for the turn. They were stuck where they were. And much worse... if they didn’t recover at the start of the next turn, their Suppressed state would completely deny them the protection of the Forest. Their fate would be sealed.
I was determined to score a kill. In combined and overwhelming Suppression Fire, my Mortar, Infantry, and T-35 killed the Machine Gun outright. One German unit down and 13 points for me! But the Skiers would be worth 15 if Tom could kill them. My lead wasn’t enough.
My task was made considerably harder when the German Infantry in the same hex, unperturbed by the mortar fire, executed their Ambush order and vanished from the board. So did Tom’s two Infantry units in the second Forest further back. My T-35 had no more targets and couldn’t enter the Forest to flush them out.
Tom’s mortar, useless now where it was, Withdrew so it could move next turn.
SCORE: Germans 0, Soviets 13
TURN 3
To my great relief, the Ski troops passed their Fortitude test in the Recovery phase. If they survived the early phases of the turn they would be able to follow their orders to make a Careful Move (for an additional +1 Defense) out of the woods and out of the Panzer’s sight.

The cautious move paid off, as in Suppression Fire the Panzer III scored 4 hits – exactly the Ski unit’s defense value thanks to the Forest and the Careful Move. Better yet, I passed the Fortitude test for having come under Suppressive Fire… and the Ski unit slipped away behind the woods.
Significantly, Tom’s Panzer III had now used seven of its 10 Ammunition points for the game.
Over near the Soviet-held town, I faced a problem with Tom’s infantry having vanished from sight. Tanks can’t enter a Forest, so the T-35 was helpless to reveal the Ambushing German infantry. I did have one option though – the Mortar could uniquely use its Area Fire ability to subject the Forest hex to Suppression Fire. If Tom’s infantry in the Forest failed its Fortitude test (by rolling 9+ on two dice), they would be revealed and vulnerable. And since the Suppression Fire attack itself would force the test even if it caused no wounds, the protection of the Forest wouldn't matter much. These weren’t great odds, but it seemed my best gamble.
I gave the Mortar a Suppression Fire order, and gave the T-35 tank and my nearby Infantry “Open Fire” orders with Tom’s Infantry #4 in the Forest as the target. Those orders would only work if their target failed its test and was exposed when the Open Fire phase arrived.
But it was not to be. The Mortar rolled a single hit, unsurprisingly scoring no wounds; and Tom’s infantry passed the test. The T-35 and my infantry had no target and their order was wasted, though they expended no ammunition.
And like Tom’s Panzer III, my mortar had now expended seven of its 10 points of ammunition; I could only try this once more.
As a second gamble to expose Tom’s infantry, I had ordered one of the Militia to abandon their almost-complete trench at the front of the town and advance up the road, hoping to trigger the German infantry’s fire by entering his arc and range as I approached and reveal the unit.
The Militia unit wasn’t likely to fare well, but it was worth only 7 points. The German Infantry would gain me 14. It was time to sacrifice a pawn. This turn, though, it didn’t work; the hidden German infantry's chosen range, arc, or both weren’t cooperating with my plan.
Elsewhere on the board, Tom’s mortar moved forward one hex, and his StuG III surged along the road to begin hunting the T-35.
SCORE: Germans 0, Soviets 13
TURN 4
I still wanted to expose Tom’s infantry, so I repeated the Suppression Fire on its Forest hex with the Mortar. My Infantry again used an Open Fire order hoping its target would reveal itself. The T-35 used a Move and Fire order this time; I wanted to take that shot at the infantry if I could, but I also wanted to put some distance between the T-35 and the approaching StuG.
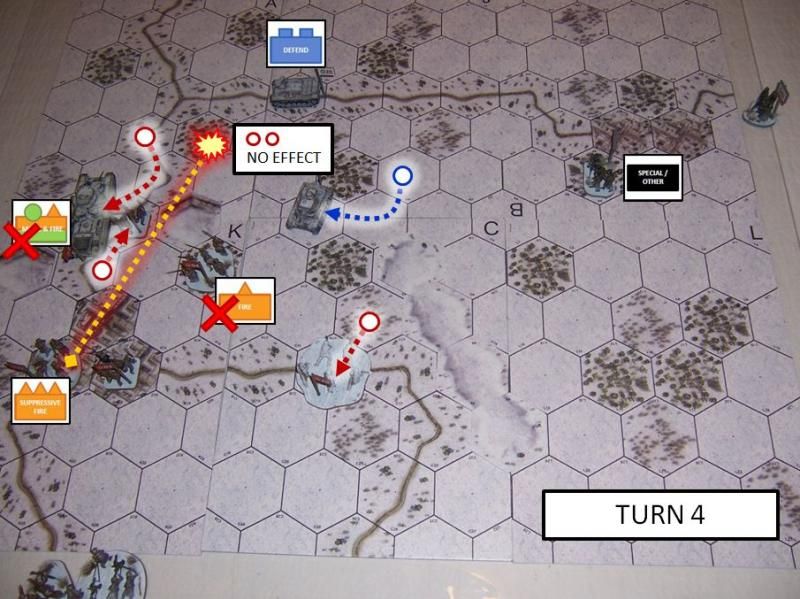
But once again Tom’s infantry passed their test; they were now almost unassailable in the Forest. Even another hex of movement up the road by the Militia didn’t trick the disciplined Germans into revealing themselves.
Tom’s StuG had chosen to Defend, thinking my T-35 might try attacking him; instead the T-35 had slipped away toward the town. In the German town, the mortar Deployed in its new location.
The Ski troops and Tom’s Panzer III continued to play cat-and-mouse; but the result had put the ski troops in the tank’s range for the next turn.
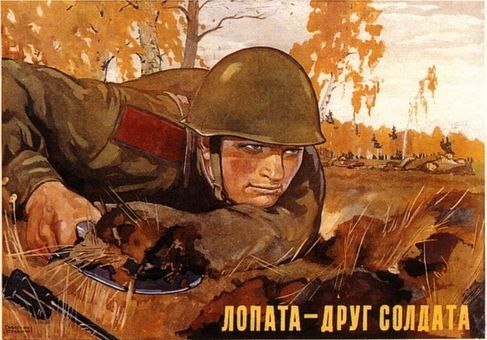
On the good news front: my Militia unit that had stayed in the town had finished digging its new trench (and I had completed my first trench in Battle for Moscow)! Huzzah!
"The shovel is the soldier’s friend."
SCORE: Germans 0, Soviets 13
TURN 5
I thought my time had run out to try killing Tom’s leading infantry still hiding in the Forest, and the Mortar had run out of ammunition anyway. It was time for a retreat back into the protection of the town, a decent strategy if I could cling to my 13-point lead and leave Tom no choice but to attack me there.

The T-35 pulled back into the town. But I used a Move and Fire order with the Panzer III as the target; I thought I might be able to dissuade the German tank from pursuing the Ski troops. The Militia trudged slowly back up the road as well. The StuG advanced and aimed itself up the road leading directly to the German objective.
I had expected Tom to fire at the ski troops with the Panzer, but instead he advanced toward the town. I think he was mindful that he had only three ammunition remaining – enough for three regular attacks or one Suppression Fire attack. He likely wanted to use those three attacks in combination with the StuG for maximum effect. Besides, the Ski unit was four hexes away and the tank’s dice would have been hitting only on 1s at that range; even with 15 dice of Suppression Fire it was unlikely to kill its target.
As a result, my Ski infantry sailed across the snow toward the back of the town.
This also brought the German tank in range at just the right moment for the T-35’s Move and Fire order. I rolled the shot; but with the -2 Firepower penalty for using move-and-fire it bounced harmlessly off the Panzer’s armour.
In the town itself, the Militia in the rear hex that had just finished the trench advanced forward to the town's leading hex.
(In the rear hex, although not shown here, the Soviet HQ and Machine Gun used the Defend order to enter the newly-dug trench in their location, at the cost of reappearing on the board. On turn 6 they would both use the Ambush order to hide again, and be removed once more from the board.)
The game was entering its later phase, and the action had tightened closely around the Soviet-held town.
SCORE: Germans 0, Soviets 13
TURN 6
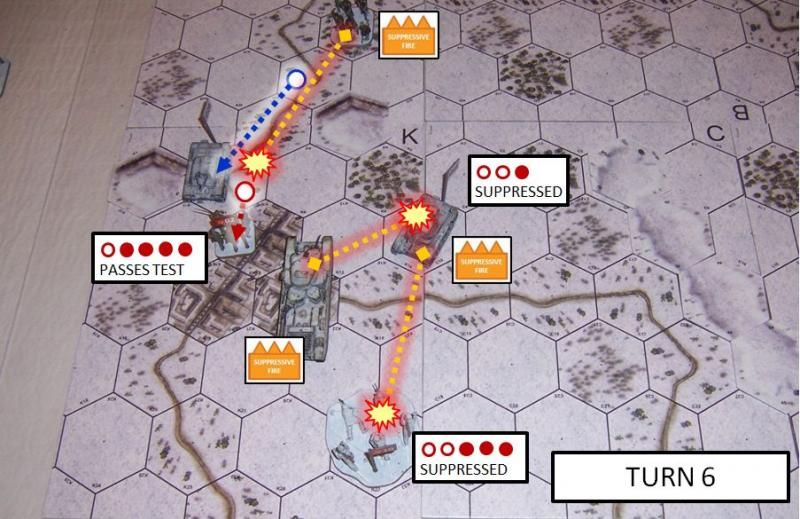
With the Panzer in range of the T-35 and conceivably under threat, Tom decided to take his chance while he was still at full strength and the Ski troops were still in the open. His Panzer III used Suppression Fire and the last of its ammunition. It was an effective shot, scoring 5 hits and inflicting three wounds (the Ski troops were using Careful Move to gain +1 Defense for a total Defense of 2). Worse for me, the Ski troops then failed their Fortitude test (despite the bonus from the nearby HQ) and became Suppressed.
My T-35 also used Suppression Fire on the Panzer III. This wasn’t the best target for the Soviet tank, but with the 50% Firepower bonus for using Suppression Fire I would roll 11 dice for 2s. I scored three hits, pretty much average, overcoming the Panzer III's two-point Defense and inflicting a casualty. And better yet, the Panzer then failed its Fortitude test.
The German tank now looked vulnerable: it was out of ammunition and, if it didn't recover at the start of the next turn, stuck where it was. Easy points if I could Assault it with the T-35 next turn! But... my T-35 had now used eight of it 10 ammunition points, so I would have to be careful how I used its last two attacks.
In front of the town, Tom’s Ambushing infantry finally chose to revealed themselves and took a Suppressive shot at the Militia just before they could slip into the cover of the town. It was a good shot; despite rolling for 1s he managed five hits with his 12 dice! The Militia were reduced to just one wound and the unit’s Fortitude dropped to 4; but with the bonus from my nearby HQ I actually passed the Fortitude test and the few surviving Militia stumbled into the town.
The StuG III moved forward and parked right at the town’s perimeter.
The Soviets still had the lead by 13 points. And the Panzer III was out of ammunition, with no way to finish the job on the Ski troops. With considerable luck (or rather Tom’s lack of it), I had managed to force Tom’s hand; the Germans had no choice but to assault the town’s defenses in search of some points.
SCORE: Germans 0, Soviets 13
And that part of the story I will tell next. But before that, it’s worth reviewing positions on the board. They’re not fully apparent from the picture above, because at this point many units are in ambush and their models aren't on the board. I know where the are, but Tom needed to rely on memory (which proved as reliable as ever).
The picture below shows which Soviet units are hiding in various hexes in and near the town, while their models lurk just off to the side of the game board.

Before the battle was over, all of these models would reappear...

I provided a detailed scenario background in my first report for this scenario. The game length is 12 turns, and the objective is to have the highest Victory Point total by the end of the game. Victory Points are obtained by:
• killing enemy units (score the unit’s point cost)
• killing or capturing the enemy HQ
• and (for the Germans) 50 points for each hex of the town containing only German units at the end of the 12th turn.
Our experience in the first game had shown how critical early kills were to seize even a tiny VP advantage; things were bound to get bloody right away!
The launching off point for the scenario

TURN 1
My experience in our first game had taught me that I had to get out there and do some damage with the T-35 while I had the local advantage. The Panzer III did pose a modest threat to my tank, but the risk couldn’t be avoided.
Tom was likewise determined to score some points quickly; it was a race to see who could score the first points and set the terms for the battle.
For the first turn, since so much was going on I have used separate illustrations to show movement and then fire (although Suppressive Fire happened before the moves did.)


Tom’s HQ entered Ambush and was removed from the board to better safety. My defenders in the town shifted position while the two Militia units began to dig trenches in their respective hexes. This time I was determined that there would be an assault, and that I’d be ready for it!
Tom’s mortar surprisingly failed to wound the Ski troops (15 dice for 1s managed only a single hit), who were able to move out of its range. And once the Ski troops reached the protection of the Forest, even the additional fire later in the turn from the Panzer III failed to harm them.
The Soviets had almost the same experience. The T-35 dashed forward and fired from close range at Tom’s infantry; but this produced no effect even with support from my Mortar. The protection of the Forest was considerable!
SCORE: Germans 0, Soviets 0
TURN 2
Both sides were still out for blood, and we both had powerful units in sight and range of their targets. There would be no hesitation!

Tom’s Panzer III used Suppressive Fire, hoping to overcome the Ski troops’ protection in the Forest; but he only managed two hits which their enhanced Defense value absorbed. But to my dismay, the Skiers failed their Fortitude test, and that meant they lost their Move order for the turn. They were stuck where they were. And much worse... if they didn’t recover at the start of the next turn, their Suppressed state would completely deny them the protection of the Forest. Their fate would be sealed.
I was determined to score a kill. In combined and overwhelming Suppression Fire, my Mortar, Infantry, and T-35 killed the Machine Gun outright. One German unit down and 13 points for me! But the Skiers would be worth 15 if Tom could kill them. My lead wasn’t enough.
My task was made considerably harder when the German Infantry in the same hex, unperturbed by the mortar fire, executed their Ambush order and vanished from the board. So did Tom’s two Infantry units in the second Forest further back. My T-35 had no more targets and couldn’t enter the Forest to flush them out.
Tom’s mortar, useless now where it was, Withdrew so it could move next turn.
SCORE: Germans 0, Soviets 13
TURN 3
To my great relief, the Ski troops passed their Fortitude test in the Recovery phase. If they survived the early phases of the turn they would be able to follow their orders to make a Careful Move (for an additional +1 Defense) out of the woods and out of the Panzer’s sight.

The cautious move paid off, as in Suppression Fire the Panzer III scored 4 hits – exactly the Ski unit’s defense value thanks to the Forest and the Careful Move. Better yet, I passed the Fortitude test for having come under Suppressive Fire… and the Ski unit slipped away behind the woods.
Significantly, Tom’s Panzer III had now used seven of its 10 Ammunition points for the game.
Over near the Soviet-held town, I faced a problem with Tom’s infantry having vanished from sight. Tanks can’t enter a Forest, so the T-35 was helpless to reveal the Ambushing German infantry. I did have one option though – the Mortar could uniquely use its Area Fire ability to subject the Forest hex to Suppression Fire. If Tom’s infantry in the Forest failed its Fortitude test (by rolling 9+ on two dice), they would be revealed and vulnerable. And since the Suppression Fire attack itself would force the test even if it caused no wounds, the protection of the Forest wouldn't matter much. These weren’t great odds, but it seemed my best gamble.
I gave the Mortar a Suppression Fire order, and gave the T-35 tank and my nearby Infantry “Open Fire” orders with Tom’s Infantry #4 in the Forest as the target. Those orders would only work if their target failed its test and was exposed when the Open Fire phase arrived.
But it was not to be. The Mortar rolled a single hit, unsurprisingly scoring no wounds; and Tom’s infantry passed the test. The T-35 and my infantry had no target and their order was wasted, though they expended no ammunition.
And like Tom’s Panzer III, my mortar had now expended seven of its 10 points of ammunition; I could only try this once more.
As a second gamble to expose Tom’s infantry, I had ordered one of the Militia to abandon their almost-complete trench at the front of the town and advance up the road, hoping to trigger the German infantry’s fire by entering his arc and range as I approached and reveal the unit.
The Militia unit wasn’t likely to fare well, but it was worth only 7 points. The German Infantry would gain me 14. It was time to sacrifice a pawn. This turn, though, it didn’t work; the hidden German infantry's chosen range, arc, or both weren’t cooperating with my plan.
Elsewhere on the board, Tom’s mortar moved forward one hex, and his StuG III surged along the road to begin hunting the T-35.
SCORE: Germans 0, Soviets 13
TURN 4
I still wanted to expose Tom’s infantry, so I repeated the Suppression Fire on its Forest hex with the Mortar. My Infantry again used an Open Fire order hoping its target would reveal itself. The T-35 used a Move and Fire order this time; I wanted to take that shot at the infantry if I could, but I also wanted to put some distance between the T-35 and the approaching StuG.

But once again Tom’s infantry passed their test; they were now almost unassailable in the Forest. Even another hex of movement up the road by the Militia didn’t trick the disciplined Germans into revealing themselves.
Tom’s StuG had chosen to Defend, thinking my T-35 might try attacking him; instead the T-35 had slipped away toward the town. In the German town, the mortar Deployed in its new location.
The Ski troops and Tom’s Panzer III continued to play cat-and-mouse; but the result had put the ski troops in the tank’s range for the next turn.
On the good news front: my Militia unit that had stayed in the town had finished digging its new trench (and I had completed my first trench in Battle for Moscow)! Huzzah!
"The shovel is the soldier’s friend."

SCORE: Germans 0, Soviets 13
TURN 5
I thought my time had run out to try killing Tom’s leading infantry still hiding in the Forest, and the Mortar had run out of ammunition anyway. It was time for a retreat back into the protection of the town, a decent strategy if I could cling to my 13-point lead and leave Tom no choice but to attack me there.

The T-35 pulled back into the town. But I used a Move and Fire order with the Panzer III as the target; I thought I might be able to dissuade the German tank from pursuing the Ski troops. The Militia trudged slowly back up the road as well. The StuG advanced and aimed itself up the road leading directly to the German objective.
I had expected Tom to fire at the ski troops with the Panzer, but instead he advanced toward the town. I think he was mindful that he had only three ammunition remaining – enough for three regular attacks or one Suppression Fire attack. He likely wanted to use those three attacks in combination with the StuG for maximum effect. Besides, the Ski unit was four hexes away and the tank’s dice would have been hitting only on 1s at that range; even with 15 dice of Suppression Fire it was unlikely to kill its target.
As a result, my Ski infantry sailed across the snow toward the back of the town.
This also brought the German tank in range at just the right moment for the T-35’s Move and Fire order. I rolled the shot; but with the -2 Firepower penalty for using move-and-fire it bounced harmlessly off the Panzer’s armour.
In the town itself, the Militia in the rear hex that had just finished the trench advanced forward to the town's leading hex.
(In the rear hex, although not shown here, the Soviet HQ and Machine Gun used the Defend order to enter the newly-dug trench in their location, at the cost of reappearing on the board. On turn 6 they would both use the Ambush order to hide again, and be removed once more from the board.)
The game was entering its later phase, and the action had tightened closely around the Soviet-held town.
SCORE: Germans 0, Soviets 13
TURN 6

With the Panzer in range of the T-35 and conceivably under threat, Tom decided to take his chance while he was still at full strength and the Ski troops were still in the open. His Panzer III used Suppression Fire and the last of its ammunition. It was an effective shot, scoring 5 hits and inflicting three wounds (the Ski troops were using Careful Move to gain +1 Defense for a total Defense of 2). Worse for me, the Ski troops then failed their Fortitude test (despite the bonus from the nearby HQ) and became Suppressed.
My T-35 also used Suppression Fire on the Panzer III. This wasn’t the best target for the Soviet tank, but with the 50% Firepower bonus for using Suppression Fire I would roll 11 dice for 2s. I scored three hits, pretty much average, overcoming the Panzer III's two-point Defense and inflicting a casualty. And better yet, the Panzer then failed its Fortitude test.
The German tank now looked vulnerable: it was out of ammunition and, if it didn't recover at the start of the next turn, stuck where it was. Easy points if I could Assault it with the T-35 next turn! But... my T-35 had now used eight of it 10 ammunition points, so I would have to be careful how I used its last two attacks.
In front of the town, Tom’s Ambushing infantry finally chose to revealed themselves and took a Suppressive shot at the Militia just before they could slip into the cover of the town. It was a good shot; despite rolling for 1s he managed five hits with his 12 dice! The Militia were reduced to just one wound and the unit’s Fortitude dropped to 4; but with the bonus from my nearby HQ I actually passed the Fortitude test and the few surviving Militia stumbled into the town.
The StuG III moved forward and parked right at the town’s perimeter.
The Soviets still had the lead by 13 points. And the Panzer III was out of ammunition, with no way to finish the job on the Ski troops. With considerable luck (or rather Tom’s lack of it), I had managed to force Tom’s hand; the Germans had no choice but to assault the town’s defenses in search of some points.
SCORE: Germans 0, Soviets 13
And that part of the story I will tell next. But before that, it’s worth reviewing positions on the board. They’re not fully apparent from the picture above, because at this point many units are in ambush and their models aren't on the board. I know where the are, but Tom needed to rely on memory (which proved as reliable as ever).
The picture below shows which Soviet units are hiding in various hexes in and near the town, while their models lurk just off to the side of the game board.

Before the battle was over, all of these models would reappear...
Пожалуйста Войти , чтобы присоединиться к беседе.
- Gerry
-
- Не в сети
- Живу я здесь
-


Меньше
Больше
- Сообщений: 377
- Спасибо получено: 0
- JonDee
-
- Не в сети
- Осваиваюсь на форуме
-
Меньше
Больше
- Сообщений: 31
- Спасибо получено: 0
2 года 6 мес. назад #47278
от JonDee
JonDee ответил в теме Re: Battle for Moscow Scenario 2: Our second try
Thanks! I'll add the second half of the story sometime over the weekend.
I printed an enormous magnified version of just a single hex of the town for the pictures to go with the last half of the report... otherwise the units' positions made no sense at all.")
I printed an enormous magnified version of just a single hex of the town for the pictures to go with the last half of the report... otherwise the units' positions made no sense at all.
Пожалуйста Войти , чтобы присоединиться к беседе.
- JonDee
-
- Не в сети
- Осваиваюсь на форуме
-
Меньше
Больше
- Сообщений: 31
- Спасибо получено: 0
2 года 6 мес. назад #47279
от JonDee
JonDee ответил в теме Re: Battle for Moscow Scenario 2: Our second try
TURN 7
The start of Turn 7 marked the exact middle point of the game, and the course of the last half had become clear. The German StuG III stood on the threshold of its objective and there was little doubt what would follow. My Militia at the leading edge of the town braced for the assault.

There was one brief sortie as I gave my T-35 Assault orders. And here we did made a mistake. The German Panzer III passed its Fortitude test at the start of the turn, and Moved away toward the German town (it had no ammunition after all and would have surrendered immediately if assaulted, thanks to our use in this scenario of second-edition surrender rules). My T-35 had orders to Assault the Panzer, but the target had slipped away when my tank got there.
(And there was our mistake; in our focus on the town we had become sloppy about the turn sequence and moved everything at the same time. But Assault comes before Move Out, so my T-35 should have reached the Panzer and begun the Assault before it could move away. Ah, well. I kind of prefer the way it went anyway.)
Near the top of the map Tom moved the twin German infantry squads out of the Forest where they’d been in Ambush since the second turn – I think to prevent any further mischief by my units trying to reach the German lines. As it was they had nothing to worry about, and next turn slipped away in the Forest again where they remained for the rest of the game.
In the town itself, the StuG moved forward with an Assault order and dared the Militia to do their worst.
Tom’s order specified the unit that he could see as the target of his Assault – the wounded Militia #02 that had not yet entered Ambush. Like most infantry, the Miliita is subject to Tank Panic (shown by the icon marked A on its unit card illustration below): if it’s the target of a tank’s Assault order, it must make a Fortitude test before resolving the assault. And with its reduced Fortitude due to its many casualties, the Militia failed and became suppressed.
This had several effects.
The participants in the Turn 7 Assault
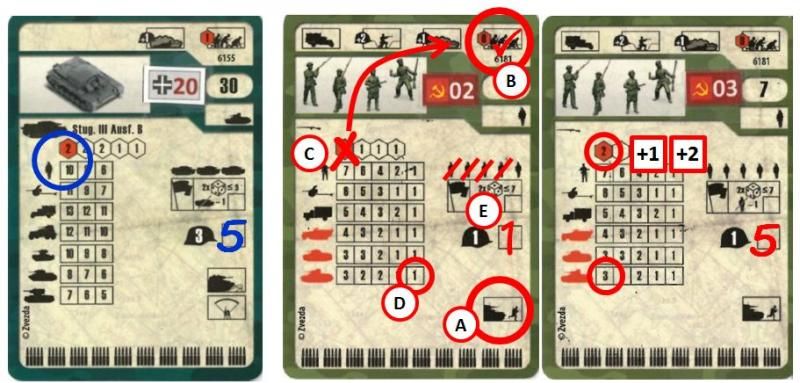
Militia #02
- The first was that I checked the Suppressed box on the Militia card (") . This meant that it would not use its normal Accuracy of 2 in the Assault (C), but rather its Suppressed Accuracy of…. Zero (. I could roll dice for the Militia if I wanted, but nothing I rolled would count as a hit!
. This meant that it would not use its normal Accuracy of 2 in the Assault (C), but rather its Suppressed Accuracy of…. Zero (. I could roll dice for the Militia if I wanted, but nothing I rolled would count as a hit!
- And besides, having suffered four casualties, the Militia’s Firepower amounted to a grim single die anyway (D).
- But worse, because it was Suppressed, the Militia lost the +3 defensive bonus of the Town and the +1 for its Ambush order; it now had only its innate 1 defense for protection (E).
Militia #03
On the other hand, my Militia unit #03 that emerged from Ambush as the StuG entered had several advantages.
- It has the town’s +3 defense bonus or infantry and the +1 defense bonus for being in Ambush, giving it a total Defense of 5.
- it gained +2 to its Accuracy for assaulting a vehicle in a town hex
- it gained another +1 to its Accuracy for executing the Ambush order as part of the Assault
It was at full strength and got to use its full Firepower, but against a medum tank this was still a grand to total of three dice. Not enough to possibly inflict a casualty on the StuG, which had itself gained the +2
Defense for vehicles in a town.
StuG III
As it turned out, the StuG had no problem dispatching the panicking Militia unit with its 10 dice of Firepower and Accuracy 2. Tom was halfway to evening up the score.
For this report I printed an enormous image of the hex in question so that I could (mostly) fit the participants into the hex -- without this the cluster of models is incomprehensible.
Closeup of the assault
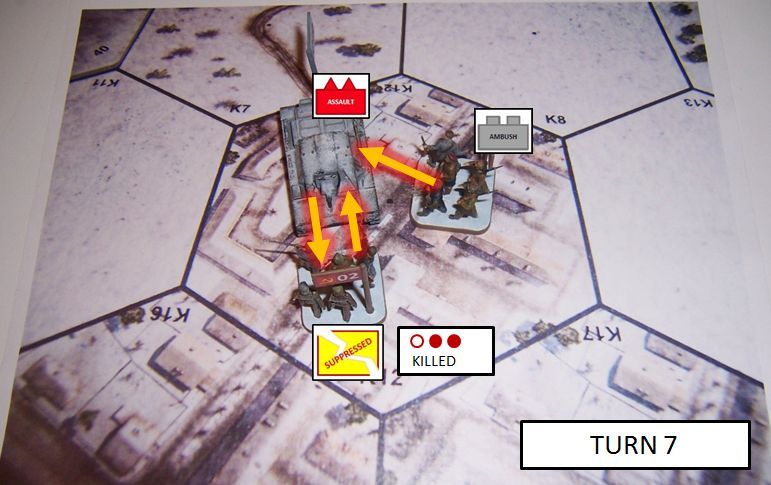
SCORE: Germans 7, Soviets 13
TURN 8
I could see that I was in trouble – the StuG had to be stopped, but he Militia alone had no chance at all. They needed help.
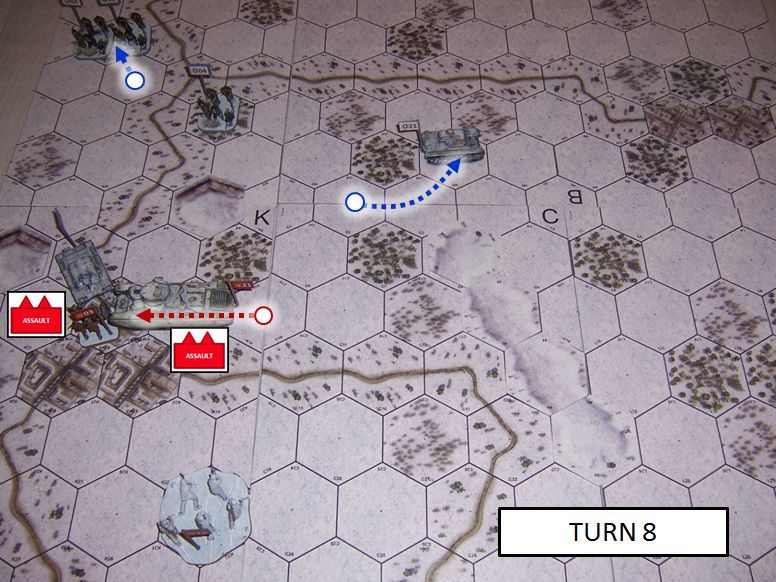
I moved the T-35 into the ongoing Assault.
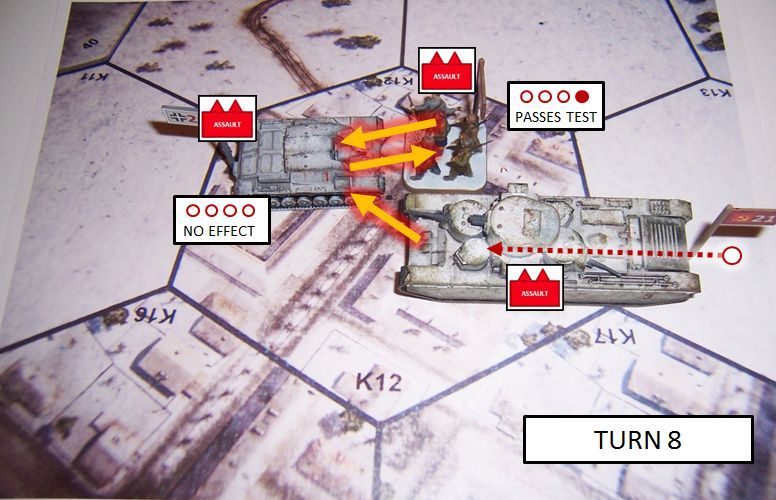
In the Assault, Tom’s StuG III carried out its orders and assaulted my Militia #03. Thankfully the bonus from the nearby HQ helped it pass the Tank Panic test, although it did receive enough hits to cause a casualty. Luckily it passed the resulting Fortitude test, the second one that turn. My Militia had lots its Ambush bonuses, but still hit back with three dice for 4s or less, and was joined by the T-35 contributing seven dice for 3s or less. But in the sharp exchange of shots and Molotov Cocktails, no damage was dealt – the defense values of the participants were just too high while they were all in good order.
But… my T-35 had to expend a point of ammunition for participating in the Assault, and it had only one remaining. And if Tom did manage to panic and kill the Militia, he would gain a one-point lead and stood to win the game.
SCORE: Germans 7, Soviets 13
TURN 9
I could see that the units I had available just didn’t have enough dice among them, and I was determined to stop the German tank. There was only one unit in position to join the fight – the Soviet HQ let out a mighty shout, leaped from its trench, and called for an all-out charge against the Assault Gun!
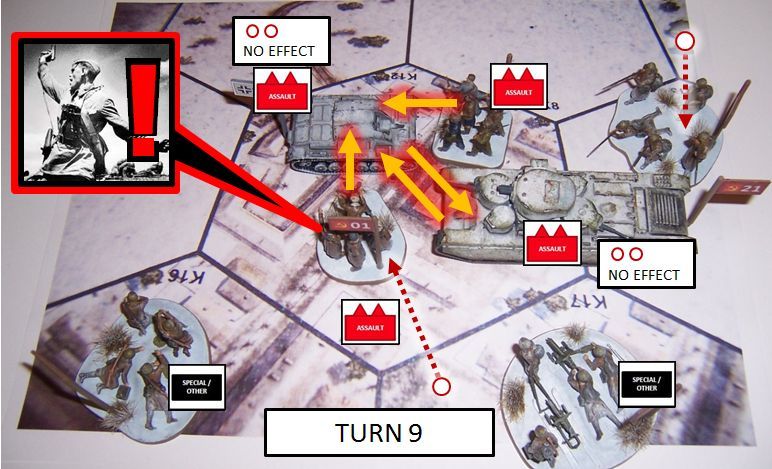
The HQ was able to move directly into the Assault, but the Machine Gun and Mortar were stuck in place by their deployed weapons. Both units used a Withdraw order to hastily limber their weapons to join the fight next turn. From the nearby Woods, my hidden Infantry unit heard the call and struggled across the open snow, now also in a position to join the fight the next turn.
In the assault, the HQ brought 2 dice hitting on 4- with its Town bonus. But still with all the dice I could throw, I could not penetrate the StuG’s defense, nor it the T-35's. It remained a stalemate. And worse… my T-35 had just expended the last of its ammunition.
If I’d been thinking ahead, I would have given the T-35 a Careful Move to exit the hex. It would have still fought back if the StuG had attacked it, and then suffered free hits on its way out of the hex during Movement, but then would have been safe once it reached zero ammunition. Ah, well.
SCORE: Germans 7, Soviets 13
TURN 10
It was all in! The Machine Gun and Infantry joined in the Assault. With the exception of the Mortar unit (which I had remembered had no ammunition and would only be a liability if it joined), every Soviet unit in reach piled into the attack on the StuG.

The Machine Gun added 1 die for 5s or less to the assault on the the StuG, and more importantly the Infantry added four dice for 4s or less.
Tom wisely targeted the T-35 with his attack. He didn’t even need to roll dice; the Assault on the unarmed tank caused it to surrender (or, let’s say, the crew to hastily abandon the inert monster) before it could move out of the hex. Tom had scored 33 points and surged into the lead! All he had to do now was survive long enough to exit the town into the open, where he was safe from Assault – and, at this point, anything I had on the board.
And to my frustration, all of my Assault dice even with the Town bonus still couldn’t breach the 5 Defense of the StuG. I was on the verge of a loss.
SCORE: Germans 40, Soviets 13
TURN 11
Tom sensibly gave his StuG a Move order, commanding it to leave the Town; it had done its job and he had the lead he needed.
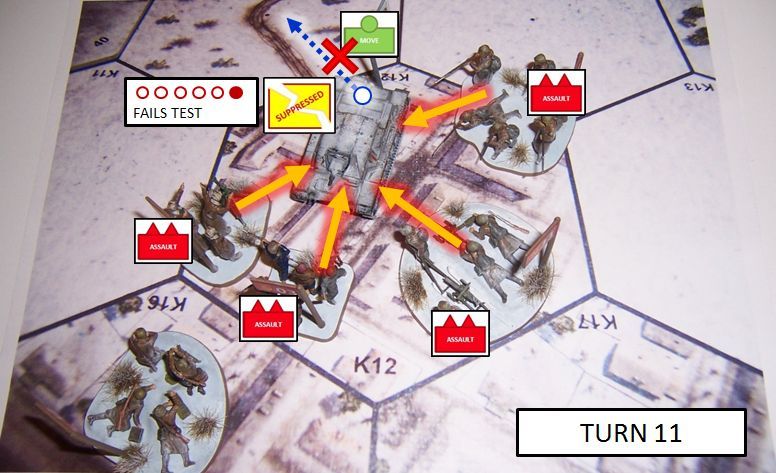
But my attacks finally came through; I rolled six hits, just enough to inflict a single casualty on the StuG. This wasn’t helpful. But to Tom’s misfortune… he rolled Fortitude due to the casualty and the StuG, its Fortitude reduced from 9 to 8 due to the loss… failed the test, in one stroke losing its Move order, and the defensive bonus from the Town.
SCORE: Germans 40, Soviets 13
TURN 12
It was the last turn of the game. Tom still had one chance to escape unharmed: he gave the StuG a Move order again, and then tested Fortitude in the Recovery phase at the start of the turn. But… the tank failed a second time, and remained stuck and exposed.
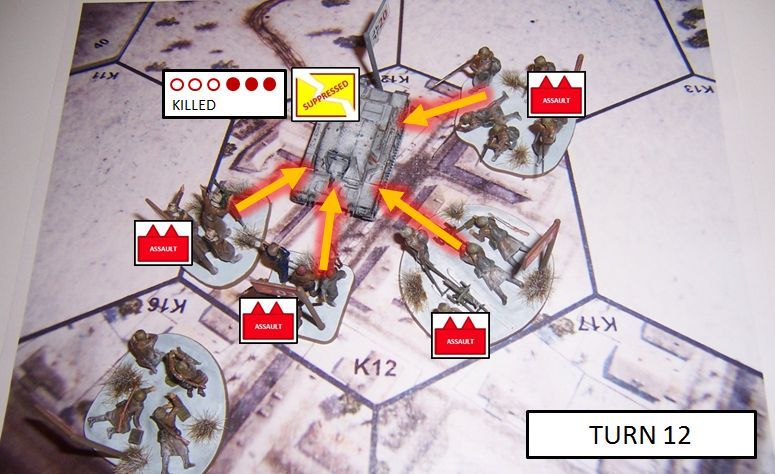
And with that, infantry swarmed over the Assault Gun. The HQ rolled only misses, but the Militia scored one hit, the Infantry hit with all four of its attacks (in the process inflicting the two casualties needed to destroy the StuG) and the Machine Gun added an extra wound with its single die for good measure. The StuG was reduced to a smoking ruin, and the Soviets’ maximum exertion had repelled the attack , secured the town, and won the battle.
SCORE: Germans 40, Soviets 43
The start of Turn 7 marked the exact middle point of the game, and the course of the last half had become clear. The German StuG III stood on the threshold of its objective and there was little doubt what would follow. My Militia at the leading edge of the town braced for the assault.

There was one brief sortie as I gave my T-35 Assault orders. And here we did made a mistake. The German Panzer III passed its Fortitude test at the start of the turn, and Moved away toward the German town (it had no ammunition after all and would have surrendered immediately if assaulted, thanks to our use in this scenario of second-edition surrender rules). My T-35 had orders to Assault the Panzer, but the target had slipped away when my tank got there.
(And there was our mistake; in our focus on the town we had become sloppy about the turn sequence and moved everything at the same time. But Assault comes before Move Out, so my T-35 should have reached the Panzer and begun the Assault before it could move away. Ah, well. I kind of prefer the way it went anyway.)
Near the top of the map Tom moved the twin German infantry squads out of the Forest where they’d been in Ambush since the second turn – I think to prevent any further mischief by my units trying to reach the German lines. As it was they had nothing to worry about, and next turn slipped away in the Forest again where they remained for the rest of the game.
In the town itself, the StuG moved forward with an Assault order and dared the Militia to do their worst.
Tom’s order specified the unit that he could see as the target of his Assault – the wounded Militia #02 that had not yet entered Ambush. Like most infantry, the Miliita is subject to Tank Panic (shown by the icon marked A on its unit card illustration below): if it’s the target of a tank’s Assault order, it must make a Fortitude test before resolving the assault. And with its reduced Fortitude due to its many casualties, the Militia failed and became suppressed.
This had several effects.
The participants in the Turn 7 Assault

Militia #02
- The first was that I checked the Suppressed box on the Militia card (
- And besides, having suffered four casualties, the Militia’s Firepower amounted to a grim single die anyway (D).
- But worse, because it was Suppressed, the Militia lost the +3 defensive bonus of the Town and the +1 for its Ambush order; it now had only its innate 1 defense for protection (E).
Militia #03
On the other hand, my Militia unit #03 that emerged from Ambush as the StuG entered had several advantages.
- It has the town’s +3 defense bonus or infantry and the +1 defense bonus for being in Ambush, giving it a total Defense of 5.
- it gained +2 to its Accuracy for assaulting a vehicle in a town hex
- it gained another +1 to its Accuracy for executing the Ambush order as part of the Assault
It was at full strength and got to use its full Firepower, but against a medum tank this was still a grand to total of three dice. Not enough to possibly inflict a casualty on the StuG, which had itself gained the +2
Defense for vehicles in a town.
StuG III
As it turned out, the StuG had no problem dispatching the panicking Militia unit with its 10 dice of Firepower and Accuracy 2. Tom was halfway to evening up the score.
For this report I printed an enormous image of the hex in question so that I could (mostly) fit the participants into the hex -- without this the cluster of models is incomprehensible.
Closeup of the assault

SCORE: Germans 7, Soviets 13
TURN 8
I could see that I was in trouble – the StuG had to be stopped, but he Militia alone had no chance at all. They needed help.

I moved the T-35 into the ongoing Assault.

In the Assault, Tom’s StuG III carried out its orders and assaulted my Militia #03. Thankfully the bonus from the nearby HQ helped it pass the Tank Panic test, although it did receive enough hits to cause a casualty. Luckily it passed the resulting Fortitude test, the second one that turn. My Militia had lots its Ambush bonuses, but still hit back with three dice for 4s or less, and was joined by the T-35 contributing seven dice for 3s or less. But in the sharp exchange of shots and Molotov Cocktails, no damage was dealt – the defense values of the participants were just too high while they were all in good order.
But… my T-35 had to expend a point of ammunition for participating in the Assault, and it had only one remaining. And if Tom did manage to panic and kill the Militia, he would gain a one-point lead and stood to win the game.
SCORE: Germans 7, Soviets 13
TURN 9
I could see that the units I had available just didn’t have enough dice among them, and I was determined to stop the German tank. There was only one unit in position to join the fight – the Soviet HQ let out a mighty shout, leaped from its trench, and called for an all-out charge against the Assault Gun!

The HQ was able to move directly into the Assault, but the Machine Gun and Mortar were stuck in place by their deployed weapons. Both units used a Withdraw order to hastily limber their weapons to join the fight next turn. From the nearby Woods, my hidden Infantry unit heard the call and struggled across the open snow, now also in a position to join the fight the next turn.
In the assault, the HQ brought 2 dice hitting on 4- with its Town bonus. But still with all the dice I could throw, I could not penetrate the StuG’s defense, nor it the T-35's. It remained a stalemate. And worse… my T-35 had just expended the last of its ammunition.
If I’d been thinking ahead, I would have given the T-35 a Careful Move to exit the hex. It would have still fought back if the StuG had attacked it, and then suffered free hits on its way out of the hex during Movement, but then would have been safe once it reached zero ammunition. Ah, well.
SCORE: Germans 7, Soviets 13
TURN 10
It was all in! The Machine Gun and Infantry joined in the Assault. With the exception of the Mortar unit (which I had remembered had no ammunition and would only be a liability if it joined), every Soviet unit in reach piled into the attack on the StuG.

The Machine Gun added 1 die for 5s or less to the assault on the the StuG, and more importantly the Infantry added four dice for 4s or less.
Tom wisely targeted the T-35 with his attack. He didn’t even need to roll dice; the Assault on the unarmed tank caused it to surrender (or, let’s say, the crew to hastily abandon the inert monster) before it could move out of the hex. Tom had scored 33 points and surged into the lead! All he had to do now was survive long enough to exit the town into the open, where he was safe from Assault – and, at this point, anything I had on the board.
And to my frustration, all of my Assault dice even with the Town bonus still couldn’t breach the 5 Defense of the StuG. I was on the verge of a loss.
SCORE: Germans 40, Soviets 13
TURN 11
Tom sensibly gave his StuG a Move order, commanding it to leave the Town; it had done its job and he had the lead he needed.

But my attacks finally came through; I rolled six hits, just enough to inflict a single casualty on the StuG. This wasn’t helpful. But to Tom’s misfortune… he rolled Fortitude due to the casualty and the StuG, its Fortitude reduced from 9 to 8 due to the loss… failed the test, in one stroke losing its Move order, and the defensive bonus from the Town.
SCORE: Germans 40, Soviets 13
TURN 12
It was the last turn of the game. Tom still had one chance to escape unharmed: he gave the StuG a Move order again, and then tested Fortitude in the Recovery phase at the start of the turn. But… the tank failed a second time, and remained stuck and exposed.

And with that, infantry swarmed over the Assault Gun. The HQ rolled only misses, but the Militia scored one hit, the Infantry hit with all four of its attacks (in the process inflicting the two casualties needed to destroy the StuG) and the Machine Gun added an extra wound with its single die for good measure. The StuG was reduced to a smoking ruin, and the Soviets’ maximum exertion had repelled the attack , secured the town, and won the battle.
SCORE: Germans 40, Soviets 43
Пожалуйста Войти , чтобы присоединиться к беседе.
- JonDee
-
- Не в сети
- Осваиваюсь на форуме
-
Меньше
Больше
- Сообщений: 31
- Спасибо получено: 0
2 года 6 мес. назад #47283
от JonDee
JonDee ответил в теме Re: Battle for Moscow Scenario 2: Our second try
AFTERMATH
So, that was a fun game! And right down to the wire.
It all came down to Tom's double-failed Fortitude tests with his StuG. Before that, the game was almost certainly his.
Trying to fight the StuG was surprisingly hard; infantry roll so few dice versus tanks that even with the bonuses to Accuracy it was very hard to get through the tank's armour and do any damage. Now for the most part the StuG couldn't harm infantry either.
But if the German player assaults the town with both tanks at once, I think he can methodically destroy one Soviet unit per turn by combining attacks on it. This is also a good reason to keep the regular Soviet infantry in the town, as their four dice are the best attack they have against tanks in Assault other than the T-35. The Skiers would be even better since they start with Accuracy 3 in Assault... if they can ever make it back to the town.
Here are a few more thoughts based on our experience.
The Skiers' mission
I have a hard time imagining how the Skiers could complete their mission and kill or capture the HQ. I think we can ignore the Capture part unless you use second-edition rules for Surrender as we did. Now it's true that if the Ski infantry can get into assault with the HQ, Mortar, or both it should have no trouble dispatching either of them: the Skiers roll 8 dice for 3s in assault. But getting there would require extreme luck, surviving at least two shots by the Mortar while in the open and likely the threat of the StuG if the German sees the Skiers making the attempt.
I'd be interested to hear whether anyone else got the Skiers to succeed in their mission.
Assaults on vehicles
This game gave us a good demonstration of how infantry fare in assaults vs. vehicles. It was really the best possible situation for the infantry and yet they still nearly failed. If neither side becomes Suppressed, then a single vehicle and one or two average infantry units are unlikely to damage each other; the defense provided by the town applies to both sides and that number is really hard to overcome.
When there's an HQ present to boost the infantry's morale, I think such assaults are close to a stalemate. Without an HQ, the infantry are far more likely to break due to Tank Panic and the advantage shifts decisively to the tank.
Ammunition (and Suppressive Fire)
I was happy to see ammunition prove itself a significant limitation. Both the Panzer III and the T-35, not to mention my Mortar, were rendered useless when they ran out of ammo due to their use of Suppression Fire a few times during the game. With no trucks for resupply this limit really is absolute, and so players need to weigh carefully whether the extra firepower for one Suppressive Fire shot is worth the ammunition...
This is a good limitation and an important factor in the game.
Surrender rules
The game would have gone a bit differently if we'd been using the proper third-edition surrender rules, in which basically never surrender unless you're surrounded by enemies and/or impassable terrain when the assault happens. I kind of prefer the second-edition rules which imposed a much harsher penalty for running out of ammunition; in third edition you can just slip away. But we'll see, and we'll return to the third-edition rules going forward. We messed with this for this game only to give the Skiers a hypothetical chance at completing their mission.
Recovery at the start of the turn
So one of the biggest changes in third edition is that the Recovery phase is moved to the start of the turn instead of the end. This lets Suppressed units recover sooner, and makes a failed Fortitude test less of a death sentence.
I think this was probably a good thing. There were a few times in our game when a unit passed a Recovery test and avoided death as a result; and a notable time in Tom's case when he failed to recover with this StuG and paid the price after all. In each case the Suppressed unit did lose its order for the turn, which is a significant penalty. I'm okay with this.
As always, I'm keen to hear from others about their experience with the scenario.
Пожалуйста Войти , чтобы присоединиться к беседе.
- Gerry
-
- Не в сети
- Живу я здесь
-
Меньше
Больше
- Сообщений: 377
- Спасибо получено: 0
2 года 6 мес. назад #47285
от Gerry
Gerry ответил в теме Re: Battle for Moscow Scenario 2: Our second try
As always, I'm keen to hear from others about their experiences with the scenario.
I agree with you, at least on two counts.
1 Surrender (surrender) in the second edition of the rules more interesting. We are in the games we play it on the second edition.
2: Move the test for resistance to the beginning of the course, too, I think a mistake. We play both in the second edition - resistance test at the end of the course. So just.
Пожалуйста Войти , чтобы присоединиться к беседе.