")
")
- Сообщений: 31
- Спасибо получено: 0
- Вы здесь:
- Главная
- Форум
- International forum
- International forum
- Battle report for Battle for Moscow Scenario 1
Battle report for Battle for Moscow Scenario 1
- JonDee
Автор темы
- Не в сети
- Осваиваюсь на форуме

Меньше Больше
2 года 6 мес. назад#47261от JonDee
JonDee создал эту тему: Battle report for Battle for Moscow Scenario 1
Here's a copy of a battle report I posted on BoardGameGeek for Battle for Moscow's Scenario 1, "Moscow is behind us!".
Original
I recently played Scenario 1 from Battle for Moscow with my friend Tom to introduced him to the new version of the game. This isn't a dramatic scenario; the action is fairly straightforward and the Soviet position is relatively static. But it does do a nice job of introducing some of the tactical considerations in the Battle for Moscow game and the way to deal with units’ abilities and limitations to achieve your objective.
The scenario pits an attacking German force against entrenched Soviet infantry. They have 10 turns to complete their assault, and at the end of the game whichever side has scored more points in killed enemy units wins the game.
The board is dominated by one powerful piece – the Soviet AA gun which is positioned on a hill, and able to kill any of the German units with equal ease.
The scenario map showing unit starting locations
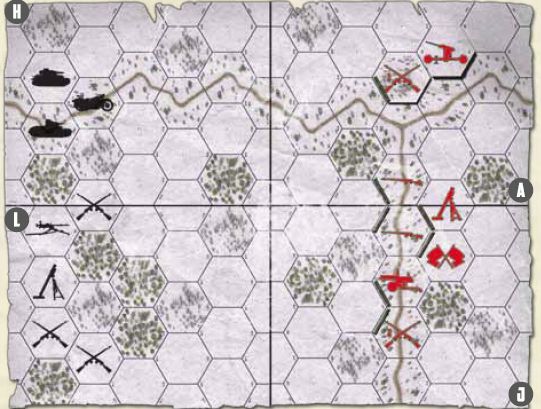
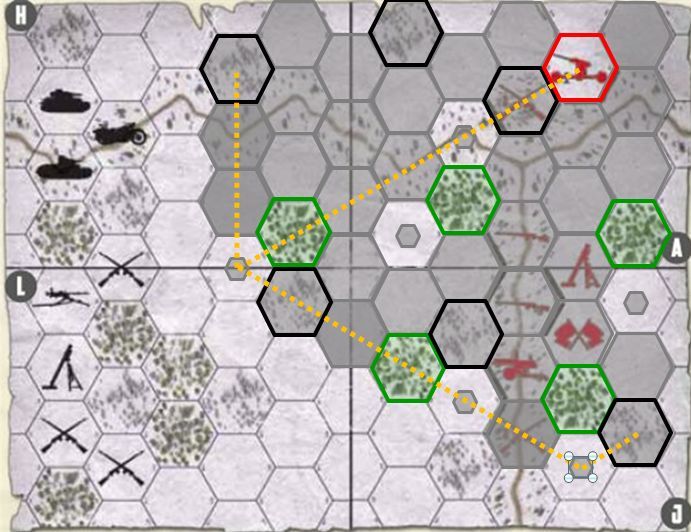
The illustration below, based on the scenario setup map, shows the positions of the respective forces and the area of the board under threat from the Soviet artillery. The AA gun's five-hex range is intimidating enough; but since it's on a hill, the extra elevation increases that range to 6. Gray hexes in the illustration are visible and in range for the gun. The zone's perimeter is a shade darker.
Half-hexes at the board edge are not playable. Green hexes (woods) and black bordered hexes (brush) both block line of sight; units at ground level can see into these hexes but not through them. The AA gun on the hill can see into these hexes, but the hex immediately beyond the terrain is hidden. Thanks to its elevaton though, the second hex beyond the terrain is visible as normal.
The Soviet AA gun's command of the battlefield
The German player’s first decision is whether he will attack or avoid the Soviet gun. There is a path to the objective that skirts the AA gun’s range, but it takes a long time to traverse through the snow. On the other hand, attacking the gun puts any approaching unit under serious threat. If the German player tries to attack the gun with his tanks, he will lose one and possibly both; and if he loses both, he’s most likely lost the game.
The Soviet player’s position is much more static, but he does have some options. One is to abandon some of the trenches and pull his forces back in a tight circle well within the AA gun’s attack radius. Most infantry units can dig a new trench in four turns, which might be long enough to create new defenses before the German infantry, struggling through the snow, can close the gap. However this forces the German player’s hand and he’s guaranteed to attack the AA gun as soon as possible – and the game will be effectively be over, one way or the other, within just a couple of turns.
Tom and I looked over the board and discussed the overall situation, then plotted our first orders.
EARLY TURNS 1-4
Tom chose to avoid the AA guns rather than risk his tanks; he suspected he could win without taking that gamble. The first four turns were uneventful as Tom’s forces crept over and up the edge of the board outside the AA gun’s radius. I shuffled some infantry around, moved the Mortar forward so it could sooner threaten the approaching Germans, and pulled the regular Soviet infantry away from the AA gun to join the others in the main trench line.
At the end of the fourth turn, the map looked like this:
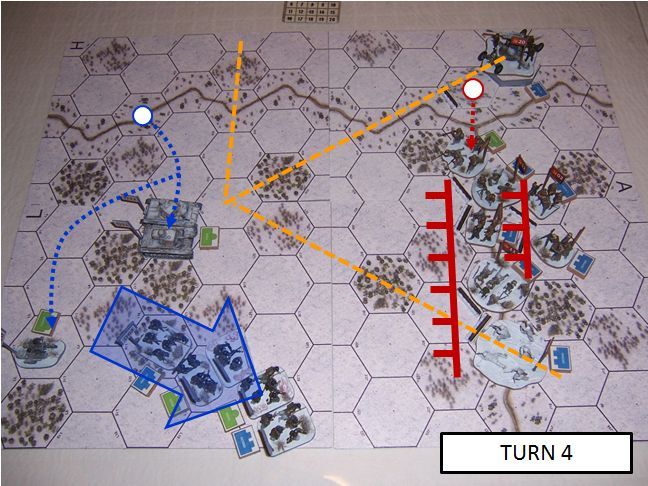
Here you can see the shape of Tom’s advance skirting the AA gun’s defended zone.
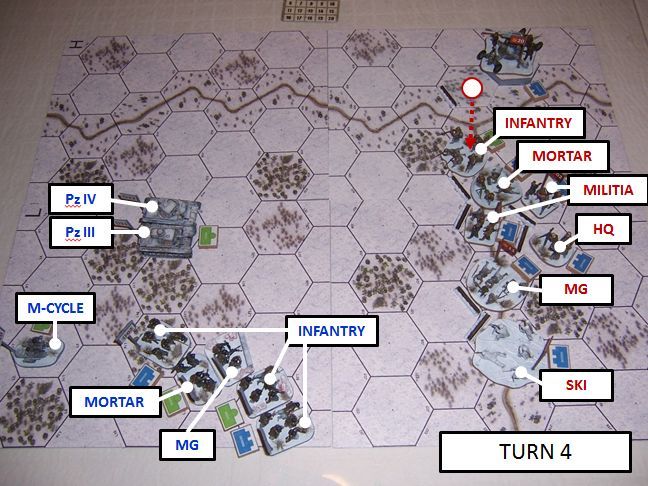
For clarity, let’s identify the various units in their positions at this point:
TURN 4 WITH UNIT LABELS
TURN 5
As I watched Tom’s concentrate infantry creep forward, I was looking for a way to buy more time and limit my losses once he arrived. If I didn’t do something, he’d just creep up, kill my infantry in their trenches with overwhelming fire with his narrow wedge of troops and tanks, and win the game outright.
The only answer seemed to be hiding at least some troops in Ambush. But this is only possible in concealment terrain: on this board, forests and brush. There was a forest slightly behind the front line on that far end of the line, where the skiers and machine gun could take safer refuge. I decided to pull them both back from that threatened flank.
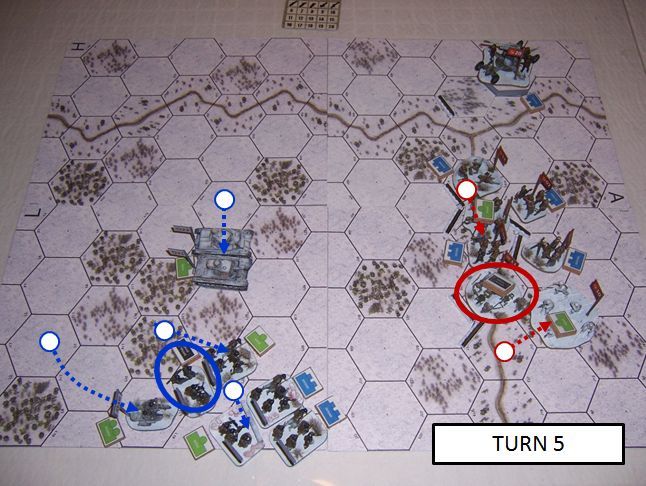
For the ski unit this was easy; a simple move order this turn would let them pull back the one hex required into the Forest. Next turn they could enter Ambush and be removed from the board.
For the machine gun, it wasn’t so simple. Support weapons like machine guns and mortars need to Deploy to fire, and must Withdraw before they can move. I gave it the Withdraw order (red circle); it would have to wait until next turn to move.
For Tom’s part, he moved the leading edge of his advance forward some more, and his Mortar – now in range of the German line -- deployed (blue circle).
TURN 6
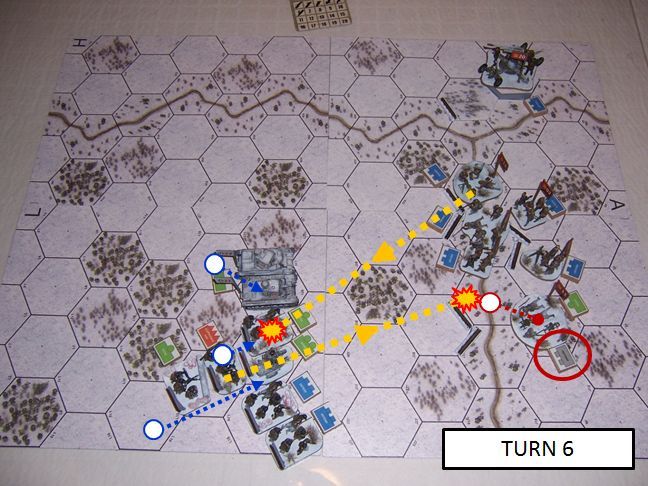
The turn began with Tom’s mortar, now deployed, using Suppression Fire on the Machine Gun. This was bad for me, because the Machine Gun had orders to Move into the woods and join the ski unit, planning to enter Ambush there. Without the defensive benefit of the trenches (I’d lost this due to the Move order), and unable even to Careful Move into the Woods, the MG had only a single point of defense, and two Wounds after that.
(Here we made a mistake; we only noticed later Indirect Fire is only allowed if a friendly HQ is on the board, and the Germans had none. Oh, well.)
Tom rolled 12 dice: his normal 10 were reduced to 8 because he was using Indirect Fire, but then increased by 50% to 12 due to Suppression Fire. (This would cost Tom three points of Ammunition, but he didn’t think the forces would exchange very many rounds of fire so he was willing to pay that cost.) To my great luck… he managed only a single 1. The Machine Gun survived without a scratch, its Defense soaking up the one hit, when by the odds it should have died outright. Even happier for me, the Machine Gun passed its Fortitude test for coming under Suppression Fire (thanks, HQ bonus!) and was able to complete its move into the Forest.
In the same Forest, the Ski unit entered Ambush and was removed from the board. It could no longer be fired at (except with area fire, like the Mortar) until it was spotted by a Scout (like the Motorcycle), an enemy entered its hex, or it revealed itself by firing. It would fire at the first eligible target that entered its range and arc, and with a +1 Accuracy bonus.
During the movement phase Tom had to move some of his troops forward to eventually press the attack. He moved two units into range: an Infantry unit, which entered the Mortar’s range with its first hex of movement; and the Motorcycle, which entered that hex on its second move.
My Mortar was compelled to fire during the first movement “impulse” in which an enemy entered its range, and the single-hex move by the Infantry accomplished this. I fired, but did no damage (rolling eight dice and getting only a single 1). Tom’s Motorcycle entered the same hex during the next hex of movement, but my Mortar had already fired so it was safe.
Also during movement, Tom’s tanks approached within range of my Mortar, yet still outside of the AA gun’s range.
TURN 7
There was now a great exchange of Suppressive Fire.
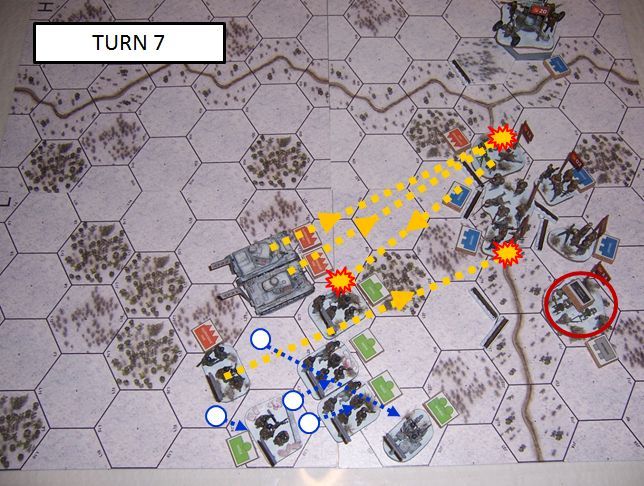
My Mortar couldn’t resist the double target of Infantry and Motorcycle, and fired a their hex hoping to damage them both. But the dice came up with no wounds on either, and both passed their Fortitude tests.
Tom’s Mortar likewise couldn’t resist the dual target of my infantry and militia, and used Suppression Fire there. Each unit was defending in a trench, and so had a total of 4 defense (innate 1, 2 for the trench, and 1 for the Defend order). Tom inflicted hits but no casualties on both units – but the Militia failed its Fortitude test (looking for 9 or less on two dice, and rolling 10). The hapless civilians panicked and leaped out of the safety of the trench, now completely exposed. Lucky for me, Tom had no further attacks on that unit or hex this turn.
However, Tom’s tanks now made short work of the Mortar, both using Suppressive Fire and annihilating it outright despite the +2 benefit from the Trench.
In the Woods, my Machine Gun used the Deploy order to set up, ready to fire (red circle). Next turn it could enter Ambush.
Tom was now in the lead, 13 points to zero. He could simply pull back and win the game… but how sporting would that be!? We carried on.
SCORE: Germans 13, Soviets 0
TURN 8
This turn was largely defensive for me; units hunkered down and the Machine Gun planned to enter Ambush.
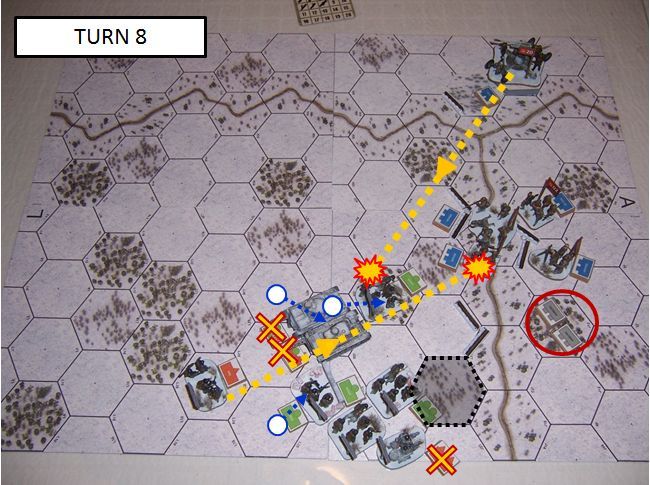
In the new third edition rules you roll for recovery from Suppression right after assigning orders. The Militia unit passed its Fortitude test in the Recovery phase and immediately used its Defend order to return to the protection of the trench in the first phase of the turn. This was a big deal; if this was second edition, that test wouldn’t come until the end of this turn, and the Militia would have been exposed to the next Mortar attack.
Tom had given his Motorcycle orders for Suppressive Fire against my Machine Gun; but he hadn’t noticed the brush in the way which prevented the attack, so the Motorcycle sat idle.
In the Open Fire phase Tom fired his mortar with a regular attack against the same infantry/militia hex; but the Militia were back in the trenches and the shots couldn't overcome their considerable defense.
The Ambush phase arrived, and my Machine Gun was removed from the board (red circle).
Then in Movement Tom moved his tanks over to fire at the Machine Gun; but it was too late, the unit was hidden and could not be seen. The tanks moved but did not fire.
(According to the rules Tom’s tanks would expend ammunition anyway, but we’ve chosen to ignore this rule; no other situations require units to expend ammunition for attacks they could not make.)
SCORE: Germans 13, Soviets 0
TURN 9
Turn 9 was mostly a setup for Tom’s final assault on my line’s flank, with a plan to expose and kill the units currently in Ambush. Tom’s forces moved sideways… and one infantry unit moved forward into the Woods in the front of my line.
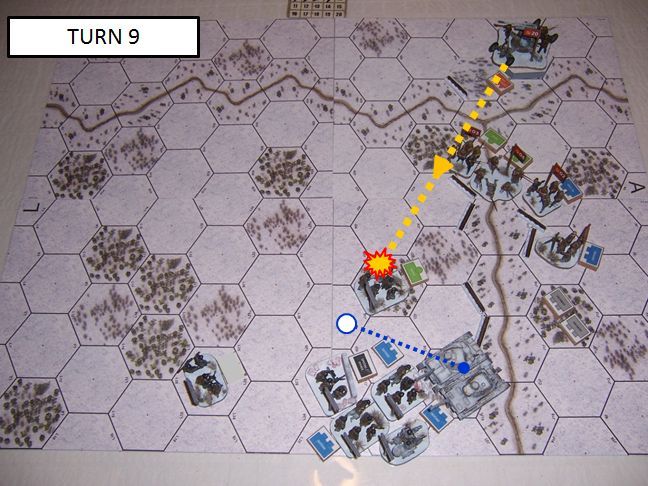
The Infantry and Militia who might have shot at him had just moved to the side, away from the tanks, and were caught off guard and unable to shoot at the approaching German. However the AA gun at last had a target – the infantry were now just inside its range. The highly accurate gun rolled 12 dice for 2s, even at his range, and scored 4 hits. (I think Tom expected the gun to be rolling for 1s and thought the woods would protect him from the few hits.) Tom’s unit lost two casualties out of its strength of five.
SCORE: Germans 13, Soviets 0
TURN 10
Only two things of significance happened this last turn of the game; one simple, and one complex.
1. My Infantry and Militia, instead of entering their trench, used Suppressive Fire against Tom’s wounded infantry.
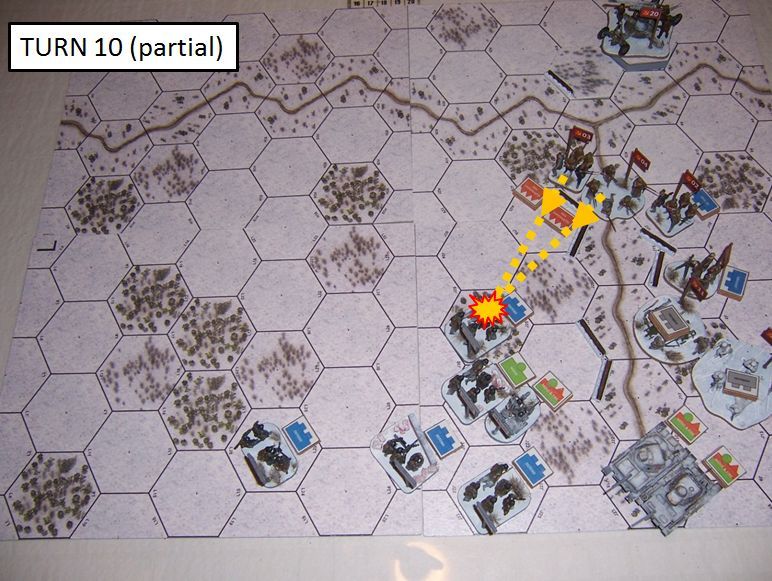
Rolling for 1s at that range, in Suppressive Fire the Militia contributed 7 * 1.5 = 11 dice; Infantry contributed 9 * 1.5 = 14 dice). The result on 25 dice was 6 hits; exactly enough to strip away the Germans' 1 innate defense, the 2 for the Forest, and then inflict the last three casualties.
The German infantry unit was destroyed, earning me 14 points. The score was now 13 for the Germans, 14 for the Soviets. I had gained a tiny, brief lead.
2. Tom hatched his plan to catch my Ambushers.
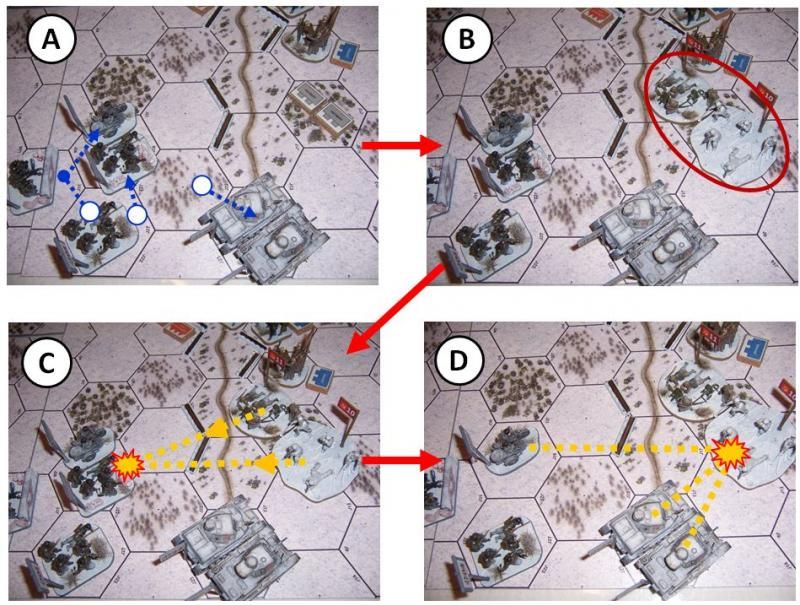
- (A)First he moved an infantry unit ahead to draw fire and expose my units. (The motorcycle actually moved into the machine gun’s hex, and would arrive alongside the infantry as shown here only later.)
- (") This did compel my Ambushers, who were set to that arc and maximum range, to reveal themselves in order to take their shot.
This did compel my Ambushers, who were set to that arc and maximum range, to reveal themselves in order to take their shot.
- (C) Both revealed units shot at the infantry unit, which was the only unit in the target hex at that moment. If this was normal defensive fire, my units would be rolling for 1s and would be unlikely to come up with the 6 hits it took to kill the unit outright. But this was Ambush and both units fired with +1 Accuracy; instead of 1s, they were looking for 1s and 2s. Between them they rolled exactly six hits, and killed the unit.
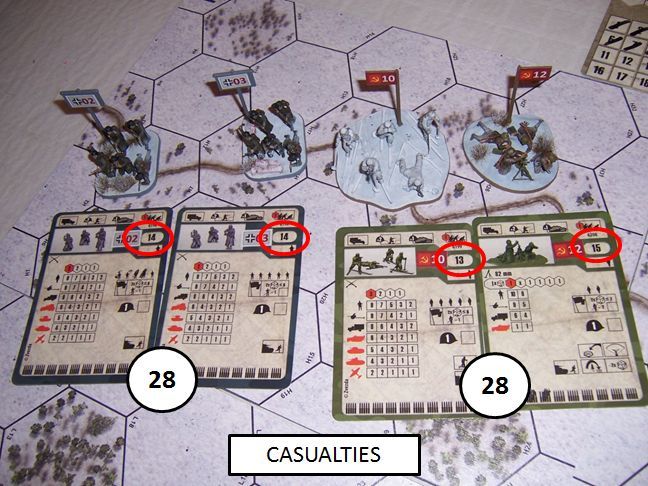
I had just added 14 points to my total; it was now 28 for the Soviets to 13 for the Germans.
- (D) But now I paid the price as the exposed Ambushers played directly into Tom’s plan. His two tanks used their Move and Fire order to shoot at my Skiers (unit #10, as he’d indicated in his order), wounding them badly despite the defensive benefit of the Woods and Ambush. Then Tom moved his motorcycle its second hex and also used its Move and Fire order… scoring the last couple of hits required to kill the Ski unit.
This gained Tom 15 more points, and the total was now… 28 for the Germans, and 28 for the Soviets.
The game was over, and it was a tie.
SCORE: Germans 28, Soviets 28
THOUGHTS:
Discussing the game afterward, we lamented our various mistakes. Tom had misread the movement for his tanks; they should have been moving 2 hexes through the snow but he thought only one. This slowed his attack dramatically; even taking their long path, the tanks should have been at my line doing damage much earlier.
I realized that I really should have been pulling back to buy more time and digging new trenches, as well as moving into available woods and even brush to gain access to Ambush even sooner. The Soviets need to make the most of their units, and entering Ambush keeps them immune to most fire, forces the Germans to make a riskier close advance, and gains the Soviets +1 Accuracy when they do finally fire, making the most of their shots at the advancing Germans.
Tom was a good sport; he’d won the game on Turn 6 and could have pulled back, but we’ve both been at this too long to find much satisfaction in that. It was good of him to press on and take some risks, even though it meant he ended up with a tie instead of a win. His plan was sound, though, and if his tanks had been moving as they should he most likely would have won by a significant margin.
The Soviets certainly can’t play a purely static game here; they need to leave their initial positions and make a plan to force the Germans to take more risks. It would be interesting to try again. I’ve also got some thoughts on the German approach to the AA gun, which I’ll add to this thread shortly…
We also noticed that although ammunition is sharply limited by the absence of trucks, this battle took long enough to unfold that we knew relatively few attacks would be made. This meant that the high ammunition cost of Suppressive Fire was less of a consideration than I'd expected. But this varies with the scenario, especially the longer ones or those in which the first shots are exchanged sooner.
I’d be glad to hear other players’ experiences with different approaches to this simple first scenario for Battle for Moscow.
Original
I recently played Scenario 1 from Battle for Moscow with my friend Tom to introduced him to the new version of the game. This isn't a dramatic scenario; the action is fairly straightforward and the Soviet position is relatively static. But it does do a nice job of introducing some of the tactical considerations in the Battle for Moscow game and the way to deal with units’ abilities and limitations to achieve your objective.
The scenario pits an attacking German force against entrenched Soviet infantry. They have 10 turns to complete their assault, and at the end of the game whichever side has scored more points in killed enemy units wins the game.
The board is dominated by one powerful piece – the Soviet AA gun which is positioned on a hill, and able to kill any of the German units with equal ease.
The scenario map showing unit starting locations

The illustration below, based on the scenario setup map, shows the positions of the respective forces and the area of the board under threat from the Soviet artillery. The AA gun's five-hex range is intimidating enough; but since it's on a hill, the extra elevation increases that range to 6. Gray hexes in the illustration are visible and in range for the gun. The zone's perimeter is a shade darker.
Half-hexes at the board edge are not playable. Green hexes (woods) and black bordered hexes (brush) both block line of sight; units at ground level can see into these hexes but not through them. The AA gun on the hill can see into these hexes, but the hex immediately beyond the terrain is hidden. Thanks to its elevaton though, the second hex beyond the terrain is visible as normal.
The Soviet AA gun's command of the battlefield

The German player’s first decision is whether he will attack or avoid the Soviet gun. There is a path to the objective that skirts the AA gun’s range, but it takes a long time to traverse through the snow. On the other hand, attacking the gun puts any approaching unit under serious threat. If the German player tries to attack the gun with his tanks, he will lose one and possibly both; and if he loses both, he’s most likely lost the game.
The Soviet player’s position is much more static, but he does have some options. One is to abandon some of the trenches and pull his forces back in a tight circle well within the AA gun’s attack radius. Most infantry units can dig a new trench in four turns, which might be long enough to create new defenses before the German infantry, struggling through the snow, can close the gap. However this forces the German player’s hand and he’s guaranteed to attack the AA gun as soon as possible – and the game will be effectively be over, one way or the other, within just a couple of turns.
Tom and I looked over the board and discussed the overall situation, then plotted our first orders.
EARLY TURNS 1-4
Tom chose to avoid the AA guns rather than risk his tanks; he suspected he could win without taking that gamble. The first four turns were uneventful as Tom’s forces crept over and up the edge of the board outside the AA gun’s radius. I shuffled some infantry around, moved the Mortar forward so it could sooner threaten the approaching Germans, and pulled the regular Soviet infantry away from the AA gun to join the others in the main trench line.
At the end of the fourth turn, the map looked like this:

Here you can see the shape of Tom’s advance skirting the AA gun’s defended zone.
For clarity, let’s identify the various units in their positions at this point:
TURN 4 WITH UNIT LABELS

TURN 5
As I watched Tom’s concentrate infantry creep forward, I was looking for a way to buy more time and limit my losses once he arrived. If I didn’t do something, he’d just creep up, kill my infantry in their trenches with overwhelming fire with his narrow wedge of troops and tanks, and win the game outright.
The only answer seemed to be hiding at least some troops in Ambush. But this is only possible in concealment terrain: on this board, forests and brush. There was a forest slightly behind the front line on that far end of the line, where the skiers and machine gun could take safer refuge. I decided to pull them both back from that threatened flank.

For the ski unit this was easy; a simple move order this turn would let them pull back the one hex required into the Forest. Next turn they could enter Ambush and be removed from the board.
For the machine gun, it wasn’t so simple. Support weapons like machine guns and mortars need to Deploy to fire, and must Withdraw before they can move. I gave it the Withdraw order (red circle); it would have to wait until next turn to move.
For Tom’s part, he moved the leading edge of his advance forward some more, and his Mortar – now in range of the German line -- deployed (blue circle).
TURN 6

The turn began with Tom’s mortar, now deployed, using Suppression Fire on the Machine Gun. This was bad for me, because the Machine Gun had orders to Move into the woods and join the ski unit, planning to enter Ambush there. Without the defensive benefit of the trenches (I’d lost this due to the Move order), and unable even to Careful Move into the Woods, the MG had only a single point of defense, and two Wounds after that.
(Here we made a mistake; we only noticed later Indirect Fire is only allowed if a friendly HQ is on the board, and the Germans had none. Oh, well.)
Tom rolled 12 dice: his normal 10 were reduced to 8 because he was using Indirect Fire, but then increased by 50% to 12 due to Suppression Fire. (This would cost Tom three points of Ammunition, but he didn’t think the forces would exchange very many rounds of fire so he was willing to pay that cost.) To my great luck… he managed only a single 1. The Machine Gun survived without a scratch, its Defense soaking up the one hit, when by the odds it should have died outright. Even happier for me, the Machine Gun passed its Fortitude test for coming under Suppression Fire (thanks, HQ bonus!) and was able to complete its move into the Forest.
In the same Forest, the Ski unit entered Ambush and was removed from the board. It could no longer be fired at (except with area fire, like the Mortar) until it was spotted by a Scout (like the Motorcycle), an enemy entered its hex, or it revealed itself by firing. It would fire at the first eligible target that entered its range and arc, and with a +1 Accuracy bonus.
During the movement phase Tom had to move some of his troops forward to eventually press the attack. He moved two units into range: an Infantry unit, which entered the Mortar’s range with its first hex of movement; and the Motorcycle, which entered that hex on its second move.
My Mortar was compelled to fire during the first movement “impulse” in which an enemy entered its range, and the single-hex move by the Infantry accomplished this. I fired, but did no damage (rolling eight dice and getting only a single 1). Tom’s Motorcycle entered the same hex during the next hex of movement, but my Mortar had already fired so it was safe.
Also during movement, Tom’s tanks approached within range of my Mortar, yet still outside of the AA gun’s range.
TURN 7
There was now a great exchange of Suppressive Fire.

My Mortar couldn’t resist the double target of Infantry and Motorcycle, and fired a their hex hoping to damage them both. But the dice came up with no wounds on either, and both passed their Fortitude tests.
Tom’s Mortar likewise couldn’t resist the dual target of my infantry and militia, and used Suppression Fire there. Each unit was defending in a trench, and so had a total of 4 defense (innate 1, 2 for the trench, and 1 for the Defend order). Tom inflicted hits but no casualties on both units – but the Militia failed its Fortitude test (looking for 9 or less on two dice, and rolling 10). The hapless civilians panicked and leaped out of the safety of the trench, now completely exposed. Lucky for me, Tom had no further attacks on that unit or hex this turn.
However, Tom’s tanks now made short work of the Mortar, both using Suppressive Fire and annihilating it outright despite the +2 benefit from the Trench.
In the Woods, my Machine Gun used the Deploy order to set up, ready to fire (red circle). Next turn it could enter Ambush.
Tom was now in the lead, 13 points to zero. He could simply pull back and win the game… but how sporting would that be!? We carried on.
SCORE: Germans 13, Soviets 0
TURN 8
This turn was largely defensive for me; units hunkered down and the Machine Gun planned to enter Ambush.

In the new third edition rules you roll for recovery from Suppression right after assigning orders. The Militia unit passed its Fortitude test in the Recovery phase and immediately used its Defend order to return to the protection of the trench in the first phase of the turn. This was a big deal; if this was second edition, that test wouldn’t come until the end of this turn, and the Militia would have been exposed to the next Mortar attack.
Tom had given his Motorcycle orders for Suppressive Fire against my Machine Gun; but he hadn’t noticed the brush in the way which prevented the attack, so the Motorcycle sat idle.
In the Open Fire phase Tom fired his mortar with a regular attack against the same infantry/militia hex; but the Militia were back in the trenches and the shots couldn't overcome their considerable defense.
The Ambush phase arrived, and my Machine Gun was removed from the board (red circle).
Then in Movement Tom moved his tanks over to fire at the Machine Gun; but it was too late, the unit was hidden and could not be seen. The tanks moved but did not fire.
(According to the rules Tom’s tanks would expend ammunition anyway, but we’ve chosen to ignore this rule; no other situations require units to expend ammunition for attacks they could not make.)
SCORE: Germans 13, Soviets 0
TURN 9
Turn 9 was mostly a setup for Tom’s final assault on my line’s flank, with a plan to expose and kill the units currently in Ambush. Tom’s forces moved sideways… and one infantry unit moved forward into the Woods in the front of my line.

The Infantry and Militia who might have shot at him had just moved to the side, away from the tanks, and were caught off guard and unable to shoot at the approaching German. However the AA gun at last had a target – the infantry were now just inside its range. The highly accurate gun rolled 12 dice for 2s, even at his range, and scored 4 hits. (I think Tom expected the gun to be rolling for 1s and thought the woods would protect him from the few hits.) Tom’s unit lost two casualties out of its strength of five.
SCORE: Germans 13, Soviets 0
TURN 10
Only two things of significance happened this last turn of the game; one simple, and one complex.
1. My Infantry and Militia, instead of entering their trench, used Suppressive Fire against Tom’s wounded infantry.

Rolling for 1s at that range, in Suppressive Fire the Militia contributed 7 * 1.5 = 11 dice; Infantry contributed 9 * 1.5 = 14 dice). The result on 25 dice was 6 hits; exactly enough to strip away the Germans' 1 innate defense, the 2 for the Forest, and then inflict the last three casualties.
The German infantry unit was destroyed, earning me 14 points. The score was now 13 for the Germans, 14 for the Soviets. I had gained a tiny, brief lead.
2. Tom hatched his plan to catch my Ambushers.

- (A)First he moved an infantry unit ahead to draw fire and expose my units. (The motorcycle actually moved into the machine gun’s hex, and would arrive alongside the infantry as shown here only later.)
- (
- (C) Both revealed units shot at the infantry unit, which was the only unit in the target hex at that moment. If this was normal defensive fire, my units would be rolling for 1s and would be unlikely to come up with the 6 hits it took to kill the unit outright. But this was Ambush and both units fired with +1 Accuracy; instead of 1s, they were looking for 1s and 2s. Between them they rolled exactly six hits, and killed the unit.
I had just added 14 points to my total; it was now 28 for the Soviets to 13 for the Germans.
- (D) But now I paid the price as the exposed Ambushers played directly into Tom’s plan. His two tanks used their Move and Fire order to shoot at my Skiers (unit #10, as he’d indicated in his order), wounding them badly despite the defensive benefit of the Woods and Ambush. Then Tom moved his motorcycle its second hex and also used its Move and Fire order… scoring the last couple of hits required to kill the Ski unit.
This gained Tom 15 more points, and the total was now… 28 for the Germans, and 28 for the Soviets.
The game was over, and it was a tie.
SCORE: Germans 28, Soviets 28

THOUGHTS:
Discussing the game afterward, we lamented our various mistakes. Tom had misread the movement for his tanks; they should have been moving 2 hexes through the snow but he thought only one. This slowed his attack dramatically; even taking their long path, the tanks should have been at my line doing damage much earlier.
I realized that I really should have been pulling back to buy more time and digging new trenches, as well as moving into available woods and even brush to gain access to Ambush even sooner. The Soviets need to make the most of their units, and entering Ambush keeps them immune to most fire, forces the Germans to make a riskier close advance, and gains the Soviets +1 Accuracy when they do finally fire, making the most of their shots at the advancing Germans.
Tom was a good sport; he’d won the game on Turn 6 and could have pulled back, but we’ve both been at this too long to find much satisfaction in that. It was good of him to press on and take some risks, even though it meant he ended up with a tie instead of a win. His plan was sound, though, and if his tanks had been moving as they should he most likely would have won by a significant margin.
The Soviets certainly can’t play a purely static game here; they need to leave their initial positions and make a plan to force the Germans to take more risks. It would be interesting to try again. I’ve also got some thoughts on the German approach to the AA gun, which I’ll add to this thread shortly…
We also noticed that although ammunition is sharply limited by the absence of trucks, this battle took long enough to unfold that we knew relatively few attacks would be made. This meant that the high ammunition cost of Suppressive Fire was less of a consideration than I'd expected. But this varies with the scenario, especially the longer ones or those in which the first shots are exchanged sooner.
I’d be glad to hear other players’ experiences with different approaches to this simple first scenario for Battle for Moscow.
Пожалуйста Войти , чтобы присоединиться к беседе.
- Roger Nilson
- Не в сети
- Новый участник


Меньше Больше
- Сообщений: 13
- Спасибо получено: 0
2 года 6 мес. назад#47337от Roger Nilson
Roger Nilson ответил в теме Re: Battle report for Battle for Moscow Scenario 1
Man I wish you lived closer to Calgary.
I've finally gotten in some games and we're painting up units.
Armed with Paul Carells trilogy I'm writing scenarios.
-great work.
-Roger
I've finally gotten in some games and we're painting up units.
Armed with Paul Carells trilogy I'm writing scenarios.
-great work.
-Roger
Пожалуйста Войти , чтобы присоединиться к беседе.
- JonDee
- Не в сети
- Осваиваюсь на форуме
Меньше Больше
- Сообщений: 31
- Спасибо получено: 0
2 года 6 мес. назад#47338от JonDee
JonDee ответил в теме Re: Battle report for Battle for Moscow Scenario 1
Haha! Thanks. Yeah, I know what you mean -- seems like English-language AoT fans are a scattered few, so it's hard to find players to be sure. I have a regular wargaming partner in town that I've known for ages, and I'm meeting someone else who plays the game in a local boardgaming club soon.
I'm trying to do my part to raise awareness of this game on BoardGameGeek for this EXACT reason.")
Good luck with your games! If you're inclined to post a bit about your experiences I'm sure it would be fun to read.
I'm trying to do my part to raise awareness of this game on BoardGameGeek for this EXACT reason.
Good luck with your games! If you're inclined to post a bit about your experiences I'm sure it would be fun to read.
Пожалуйста Войти , чтобы присоединиться к беседе.
- Mr. Колесо
- Не в сети
- Давно я тут


Меньше Больше
- Сообщений: 96
- Спасибо получено: 0
2 года 6 мес. назад#47342от Mr. Колесо
Я не знаю, каким оружием будет вестись Третья Мировая война, но в четвёртой будут использоваться палки и камни.
Mr. Колесо ответил в теме Re: Battle report for Battle for Moscow Scenario 1
Nice report. But as skiers cost 16 now (here you can find up-to-date cards https://yadi.sk/d/--zCkG4ZCrr3e/%D0%9F%D1%80%D0%BE%D0%B4%D1%83%D0%BA%D1%86%D0%B8%D1%8F%20ZVEZDA/%D0%98%D0%B3%D1%80%D0%BE%D0%B2%D1%8B%D0%B5%20%D1%81%D0%B8%D1%81%D1%82%D0%B5%D0%BC%D1%8B/61-62%20%D1%81%D0%B5%D1%80%D0%B8%D1%8F%20(%D0%92%D1%82%D0%BE%D1%80%D0%B0%D1%8F%20%D0%BC%D0%B8%D1%80%D0%BE%D0%B2%D0%B0%20%D0%B2%D0%BE%D0%B9%D0%BD%D0%B0)/) Soviets were deafeted
Я не знаю, каким оружием будет вестись Третья Мировая война, но в четвёртой будут использоваться палки и камни.
Пожалуйста Войти , чтобы присоединиться к беседе.
- JonDee
- Не в сети
- Осваиваюсь на форуме
Меньше Больше
- Сообщений: 31
- Спасибо получено: 0
2 года 6 мес. назад#47344от JonDee
JonDee ответил в теме Re: Battle report for Battle for Moscow Scenario 1
Interesting! Thanks for the link.
Do you have a link to a place where Zvezda announces updated unit costs? I looked in the "Official changes in the game" / "Official changes in the cards squads" / "Unit costs" subforum here, but that list hasn't been updated for a long time.
Do you have a link to a place where Zvezda announces updated unit costs? I looked in the "Official changes in the game" / "Official changes in the cards squads" / "Unit costs" subforum here, but that list hasn't been updated for a long time.
Пожалуйста Войти , чтобы присоединиться к беседе.
- Mr. Колесо
- Не в сети
- Давно я тут
Меньше Больше
- Сообщений: 96
- Спасибо получено: 0
2 года 6 мес. назад#47346от Mr. Колесо
Я не знаю, каким оружием будет вестись Третья Мировая война, но в четвёртой будут использоваться палки и камни.
Mr. Колесо ответил в теме Re: Battle report for Battle for Moscow Scenario 1
Zvezda doesn't have such place. Sorry. But today they published in VK (russian facebook http://vk.com/club69585287) the new list of unit's. It is in russian, but soon, i think, they will publish it in english on their official Art Of Tactic site. Also you can find some pieces of news oin VK (of course in russian)
Я не знаю, каким оружием будет вестись Третья Мировая война, но в четвёртой будут использоваться палки и камни.
Пожалуйста Войти , чтобы присоединиться к беседе.